





Making a Rope Tension Awning Yourself
panels, sizes, fabric and rope
A rope tension awning consists of fabric panels with aluminium tubes sewn in, which run on tensioned ropes. If you want to make one yourself, you have to cut the tubes to the millimetre, set the tabs evenly and choose the right rope, tensioners and gliders. Here you can read all the sizes and parts from our sewing workshop in Westoverledingen, so you can decide: sew and build it yourself, or order it made to measure and only install it yourself.

You can build a rope tension awning yourself if you can sew heavy outdoor fabric and cut aluminium tubes exactly to length. If you are planning the rope tension awning as a DIY project, you need these sizes and parts:
- The panel: fabric with aluminium tubes sewn in concealed in fabric tabs, tube spacing 38 to 41 cm, panel width around 150 cm, valance 15 cm.
- Tube and caps: the tube is 15 mm narrower than the clear measurement, and the caps each protrude about 2.5 mm. With the caps, this gives the clear measurement minus 10 mm, so 5 mm of play on each side.
- Fabric and rope: outdoor fabric in 320 cm width without a centre seam, 2, 3 or 4 rope guides per panel, polyester rope with a tensile load of 1,800 N.
- Operation: by hand, with an operating pole or, for high installations, with a pull cord. There is no motor for this design.
- If you do not want to sew, order the panels made to measure with complete installation accessories and only install them yourself.
What a Rope Tension Awning Consists Of
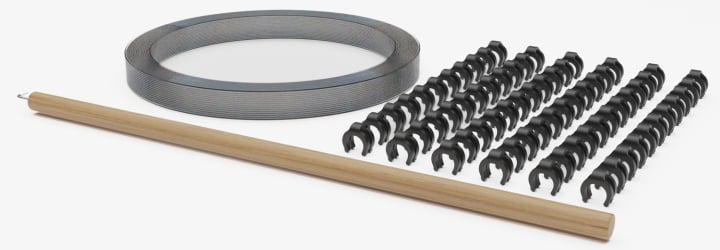
A rope tension awning is a sliding sun protection between two fixed points, usually between the rafters of a patio cover or in a pergola frame. The fabric panel runs on two or more tensioned ropes and can be pushed together. The aluminium tubes in the fabric tabs give the panel its hold across the width. Gliders connect the tubes to the rope, and stoppers hold the panel in position. This design does not need runner hooks.
- Fabric panel with fabric tabs and aluminium tubes sewn in (19 mm)
- Plastic caps on both tube ends to prevent scratches on the structure
- Valance on the front edge, standard height 15 cm
- Gliders on the tubes that run on the rope
- Stoppers that fix the last panel on the rope
- Ropes with a rope tensioner set made up of a threaded sleeve, grub screws and a tensioning element
- Operating pole for pulling out and pushing together
Clear Measurement, Tube Length and Panel Length
All sizes start from the clear measurement, that is, the free distance between the two mounting points. How to take it correctly is shown in the guide How do I measure a rope tension awning.
Width and tube length
The aluminium tube without caps is 15 mm shorter than the clear measurement. The plastic caps each protrude about 2.5 mm. With a clear measurement of 100 cm, the tube is 98.5 cm long, and 99 cm with caps. That leaves 5 mm of play on each side, and the panel does not scrape the rafters.
Tube spacing
The tubes sit 38 to 41 cm apart, depending on the length of the panel. Divide the length evenly. When pushed together, the fabric between the tubes hangs about half as deep as the section is wide. Narrower spacing gives a flatter bundle but needs more tubes.
Width of a panel
Panels of around 150 cm width are usual. If the area is wider than about 3 m, divide it into several panels. Wider panels are possible, but they are noticeably harder to pull evenly by hand. With several bays between rafters, each bay gets its own panel.
Length for each look
For the taut look, sew the panel to length without any allowance. For the cloud look, add about 5 to 7 % to the length, and the fabric then sags between the tubes.
Cloud strap on a slope
On a slope, the tubes slide down without support: the panel becomes taut at the top and sags deeply at the bottom. Two side straps, sewn to each fabric tab, hold the spacing. The fabric allowance stays the same. From a slope of about 7 to 8 %, the rule is: cloud look only with a strap, otherwise the taut look.
Space for the fabric bundle
When pushed together, the awning needs space to park. Allow about 30 to 35 cm of depth for this, preferably under the roof.
Which Fabric Suits the Rope Tension Awning
In the configurator for our rope tension awning, there are four fabrics to choose from. All four suit this design, and they differ in lightfastness, guarantee on colour fastness and price. For panels without a centre seam, you need fabric in 320 cm width.
Agora
Solution-dyed acrylic from Spain with a 5-year guarantee on colour fastness. Agora Liso is available in 320 cm width, though not in every shade.
Dralon
Proven acrylic fabric from Spain, also in 320 cm width as Acrisol Liso. Of the four fabrics, it has the weakest lightfastness, and there is no separate guarantee on colour.
Polysun
Affordable fabric made of solution-dyed polyester with a good lightfastness rating and a 2-year guarantee on colour fastness.
Olefin
Robust, with good lightfastness and a 2-year guarantee on colour fastness. The fabric is denser. We do not recommend it for large awning areas, and the gliders are more complicated to fit to the tube.
Rain
Agora and Olefin are water-repellent: normal rain beads off, but in prolonged or heavy rain water gets through. What to do in rain is explained under Leaving an awning out in rain.
Rope Guides, Rope Length and Operation
The ropes carry the panel and keep it straight. How many ropes a panel needs depends only on its width.
Rope guides per panel
Under 145 cm panel width, 2 rope guides are enough; from 145 cm it is 3, and from 300 cm 4. Use all the rope guides. If one is missing, the panel sags.
Rope length
The starting point is the clear distance between the beams. For the clamps and as a reserve for tensioning, the rope needs a little more length. When ordering, state the length including the rope tensioning system, and we supply the reserve.
Type of rope
The standard is polyester rope with a tensile load of 1,800 N. Stainless steel wire rope can be tensioned tighter and helps if a long panel sags despite tensioned ropes.
Operating by hand
Up to about 2 m height, you pull the panel directly at the glider, and up to about 3 m with the operating pole. If the awning hangs higher, for example under a conservatory roof, a pull cord helps: an endless rope over pulleys moves the panel from the floor.
Making rope tension sun protection yourself
The rope tension technique is also available without tubes: on the rope tension shade sail, the fabric slides more easily, without continuous tube spacing. If you are planning rope tension sun protection for a patio roof, you will find that version under Made-to-measure rope tension shade sail, and the fixed, tensioned sail under Building a shade sail yourself.
Building Instructions for a Rope Tension Awning
Check the structure
Check whether the rafters, pergola frame or fascia board at the front and back can carry the ropes. Without a roof over it, an awning is often not the right product.
Take the clear measurement
Measure the width and length between the mounting points. Divide the width into panels of around 150 cm.
Choose the look and fabric
Decide between the taut look and the cloud look. On a slope from about 7 to 8 %, plan the strap for the cloud look.
Sew the panels
Sew fabric tabs at a spacing of 38 to 41 cm and the valance. Cut the tubes 15 mm shorter than the clear measurement and fit the caps.
Fit and tension the ropes
Fit the rope tensioners and first tension all the ropes firmly. Only after that does the panel go onto the ropes.
Hang the panel and fix it
Hang the panel with the gliders and fit the stoppers on the last tube. Check that the panel runs smoothly.
Sewing a Rope Tension Awning Yourself
If you want to sew a rope tension awning yourself, you need a machine that can handle heavy outdoor fabric in several layers. The panel is cut in one piece, and the tabs for the tubes sit at equal spacing across the panel. How to sew the hems, tabs and valance step by step is shown in the guide Sewing an awning.
Cutting
Cut the panel to the full length plus an allowance for the look. In 320 cm width, even a wide panel stays seamless.
Tabs
The tabs must sit the same on all panels, otherwise the tubes sit crooked to each other. Measure out the spacing once and transfer it to each panel.
New fabric for the old frame
If you already have ropes and tubes and only need new fabric, read on under Re-covering an awning.
Building an Awning Yourself - What You Should Know Beforehand
An awning is not a storm or rain roof, even if you build it yourself. In rain, strong wind and storms, you retract the panel and park the fabric bundle under the roof. If you want to build a protective awning roof or a rain shelter yourself, you need a solid covering, not a fabric panel.
If the ropes are only tensioned after the panel is hung, they can hardly be pulled taut any more. The whole installation in three variants is explained under Installing a rope tension awning.
A tube the full width of the clear measurement jams between the rafters. Deduct 15 mm, and with the caps 5 mm of play remains on each side.
A roof-mounted awning, freestanding awning or articulated-arm awning are other designs with their own mechanics. What sets them apart is explained under What are awnings. If you are looking for another solution, you will find it under Alternatives to an awning.
Sourcing ropes, tensioners, gliders, tubes and fabric separately takes time, and whether everything fits together you only see on the finished panel. The made-to-measure rope tension awning comes with all the parts. The folding awning as a complete set, by contrast, runs in tracks and is also operated by hand.
General questions about installing it yourself are answered in Installing an awning yourself. For care, see Cleaning an awning, and for stains caused by damp, Removing mildew spots from an awning.
Frequently Asked Questions
Sources
Last reviewed: 23.10.2026 · Reviewer: Germes-Team
Prefer to Have It Made to Measure?
Send us the clear measurement, a photo of your cover and the look you want. We sew the panels in Westoverledingen and deliver them with all the parts for installation.