





Installing a cable awning
in three variants
There are three ways to fix the cable awning: on the fascia board, with angle tensioners between the rafters, or with stainless steel tensioners between or under the rafters. The cable tension system is the same for all of them: first set and tension the cables, then hang the panel. This page shows every step, plus what is in the box, tools, slope and typical mistakes. The details come from our workshop and from the questions customers ask us about installing over a patio.
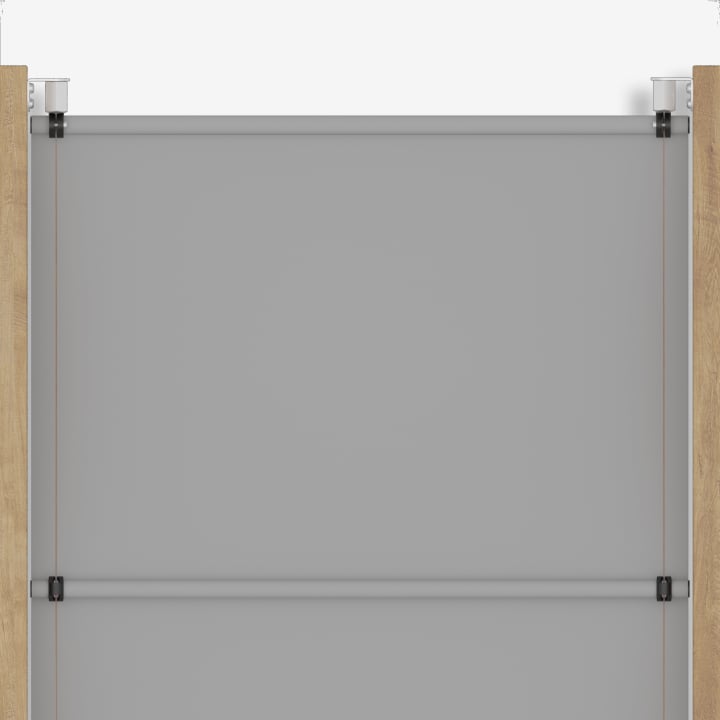
You can install the cable awning yourself. All the fixing parts are included, you just need a drill and a screwdriver. How this system differs from other awnings is explained in What are awnings. If you would rather sew the panels yourself, see Making a cable awning yourself.
- Choose a variant: fascia board at front and back, then screw hooks and standard tensioners. No fascia board, then angle tensioners at the side of the rafters. Fixing under the rafters or a compact solution, then stainless steel tensioners.
- Cables first, then the panel: set all the cables and tension them firmly, then hang the panel with its sliders.
- Cut the cable correctly: turn the tensioner right out, clamp the cable on one side, line it up on the other side together with the cable clamp, and only then cut it.
- Use every cable guide: 2 per panel under 145 cm wide, 3 from 145 cm, 4 from 300 cm.
- The panel does not touch the rafters: the aluminium tube with its plastic caps is 10 mm shorter than the clear width.
- On a slope, park the fabric stack at the highest point. A stopper on the first aluminium tube holds it there.
Which Fixing Suits Your Structure
Before you fix the cable awning, work out what the cables will hold on to. That decides which fixing kit you order and how you measure. How to take the measurements is explained in How do I measure a cable awning.
Fascia board at front and back
If your roof has a fascia board at the front and back, or a fascia board at the front and the house wall at the back, you screw in screw hooks and attach the cable with the standard tensioner. This is variant 1.
Between the rafters
If there is no fascia board, angle brackets (variant 2) or stainless steel tensioners (variant 3) sit at the side of the rafters. When retracted, the system is hardly visible, and lights in the rafters stay clear. You drill about 8 holes per bay. You can read more about holding power in a rafter under Fixing an awning to roof rafters.
Under the rafters
Stainless steel tensioners below the rafter level need only about 4 holes per bay, and one panel can cover several bays. The system then stays visible, and lights in the rafters are covered. With an aluminium frame that offers no hold between the rafters, this is the usual way. Measure from centre of rafter to centre of rafter here. If two panels are to hang from the same rafter, two tensioners of 28 mm width each need room side by side, which gets very tight on a 6 cm wide rafter.
Facade and insulated house wall
The cables on the house side can also be fixed to the face of the facade. The facade must hold the screws permanently. With plastic or composite facades we cannot judge this from a distance. On insulated facades, standard wall plugs only grip in the insulation, so you need special ETICS wall plugs that pass the load into the masonry.
Pergola or steel frame without a fascia board
The outer cables are fixed with brackets at the side of the outer beams, the middle ones under the cross beam on the garden side and to the face of the wall on the house side. With steel beams you can also screw the tensioner straight through the web, and on metal profiles the stainless steel tensioner sits directly on the profile.
Unsure about the fixing or renting
If you cannot say for certain whether the structure will hold, we first make a single panel for testing. If it holds, the rest follow. If you rent, get the landlord's written consent before drilling. Questions about the structure under a balcony are answered in Awning on a balcony with ceiling mounting.
Installation Guide as PDF and What Is in the Box
We send the installation guide for your awning digitally as a PDF with the order confirmation or the invoice. We deliberately do not include a printed copy in the parcel: we work with recycled cartons, paper packing tape and no printed instructions. If you have lost the file, we are happy to send it again. You will also find the installation guide for the cable awning with all the steps and pictures on this page. The guide for the made-to-measure folding awning also comes digitally. The awning fabric arrives made up, with the aluminium tubes in sewn-in fabric pockets.
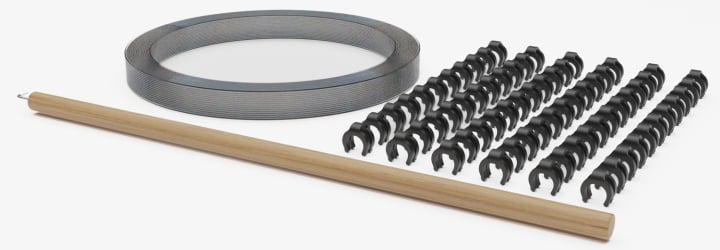
- In the box: tensioners for your installation variant, sliders, polyester cable as tension cable (2.2 mm, 1,800 N tensile load), stoppers, operating pole (80 cm) and a GERMES tool set.
- You do not need runner hooks for the cable awning: the panel runs on plastic sliders directly on the cable.
- We supply stainless steel cable only by arrangement, for example from a length of around 6.5 m.
- Length: you state the length including the cable tension system. We cut the tension cables to match, with a reserve for clamping and tensioning.
- Have ready yourself: a drill and a screwdriver or cordless screwdriver. Pliers and a few cable ties are useful.
- Single stoppers are available as spare parts. If you later want a whole new fabric, read Re-covering an awning.
Fixing to the Fascia Board
This is how you can install the cable awning if your roof has a fascia board at the front and back, meaning a cross beam across the front, or the house wall at the back. For each panel you need at least two tensioner sets, one per side.
The Parts You Need per Panel
In addition to the cable, sliders and stoppers in the box:
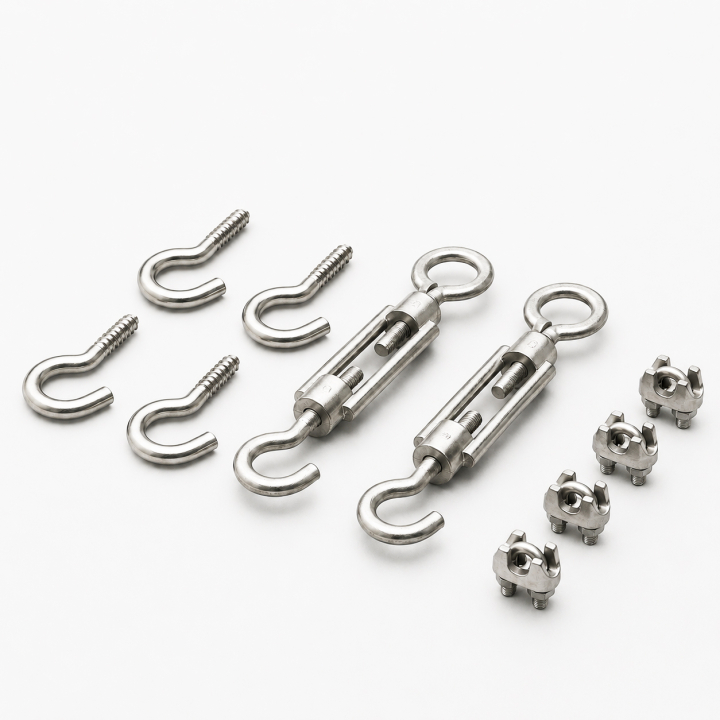
- 4 screw hooks, 2 at the front and 2 at the back in the fascia board
- 2 standard tensioners with screw hook and eyelet, turning them tensions the cable
- 4 cable clamps, 2 per cable, they clamp the cable loops
Screw the Hooks into the Fascia Board
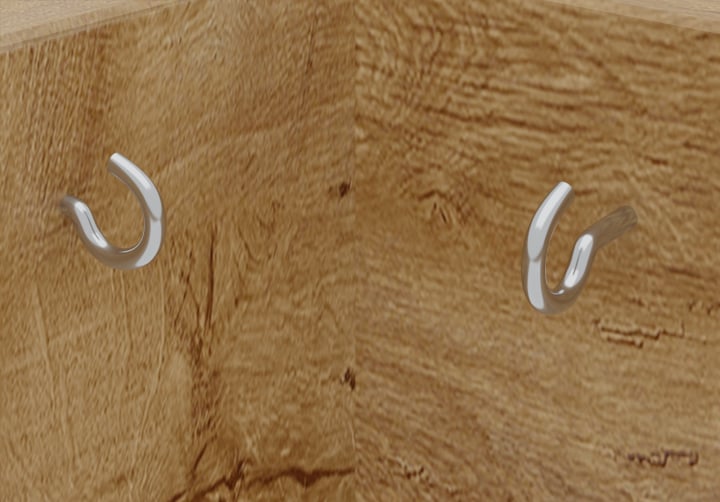
Screw 2 screw hooks into the fascia board at the front and at the back. The pairs of hooks sit at the same spacing on both sides, so the cables later run parallel. You hang one slider on each of the rear screw hooks straight away.
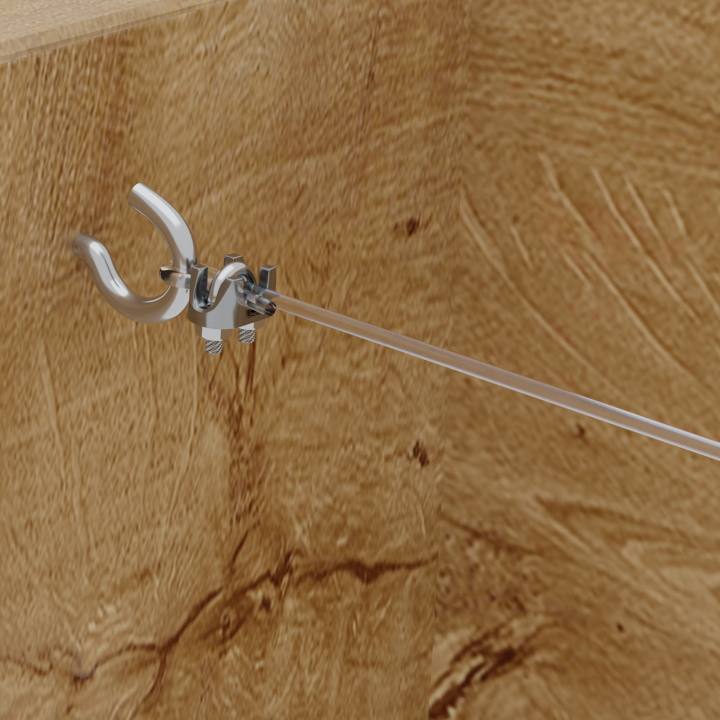
Attach the Fixed Cable End
Make a loop at the end of the cable, clamp it with a cable clamp and hang it in the front screw hook. This is the fixed end of the cable.
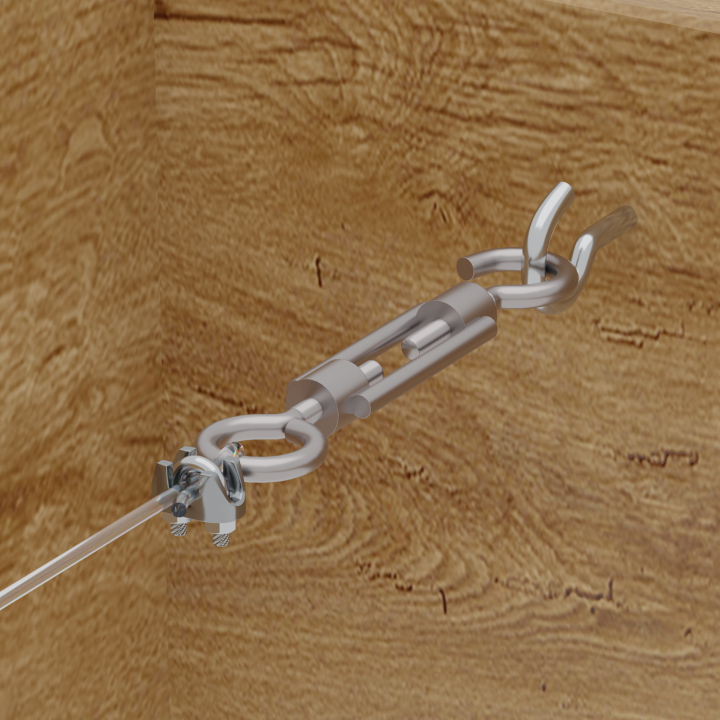
Connect the Tensioner
Turn the tensioner right open, so the full tensioning travel stays in reserve. Lay the other end of the cable as a loop around its eyelet, line it up together with the cable clamp and only then cut the cable. Hang the screw hook of the tensioner in the rear screw hook.
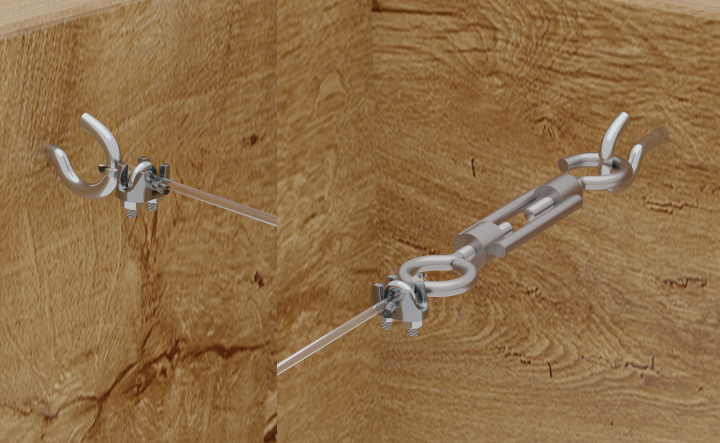
Tension the Cable
Turn the tensioner closed until the cable sits straight and taut. Do not overtension it, or you put unnecessary load on the fixing points.
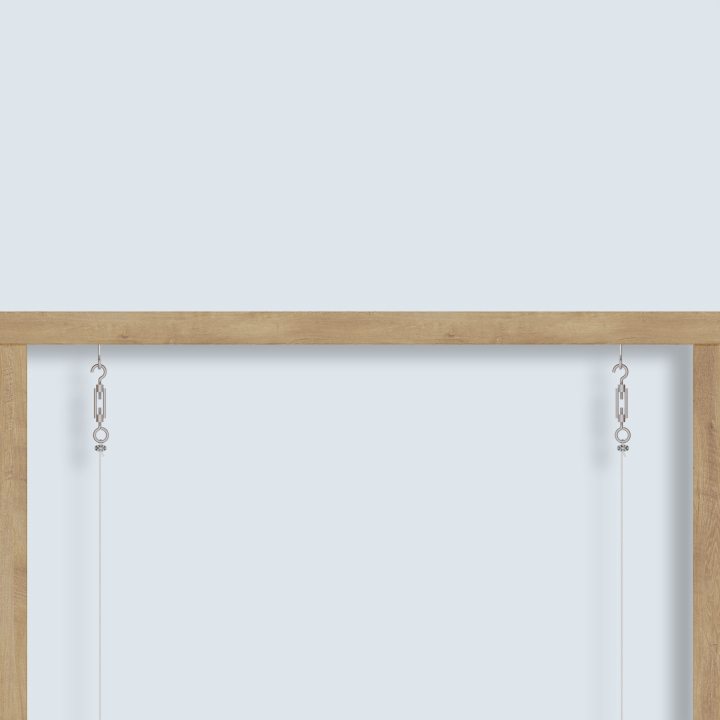
Same on the Other Side
Repeat steps 1 to 4 on the other side and at every further cable guide. Check that all the cables run parallel.
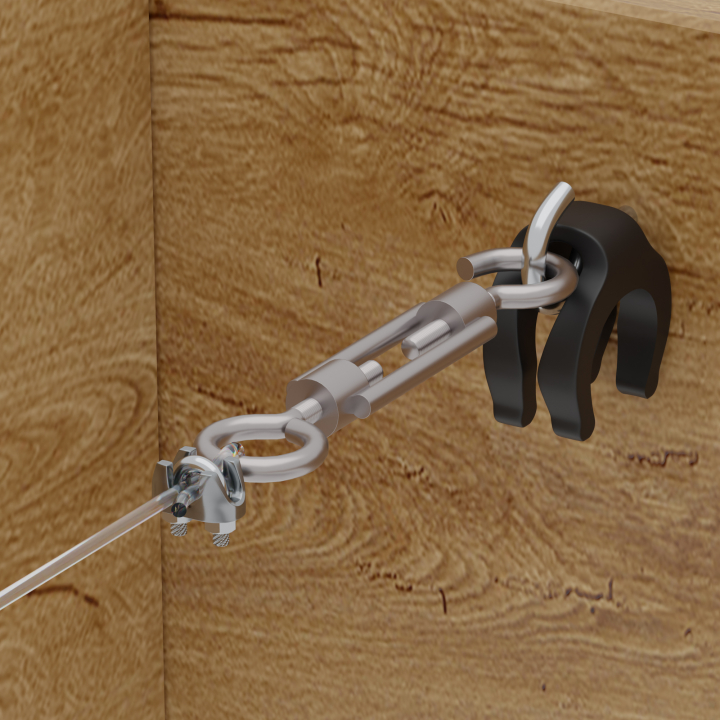
Pull On the Sliders and Hang the Panel
Pull the sliders onto the cables. Put the last slider directly on the screw hook on the tensioner side, which fixes the last aluminium tube of the panel. Then clip the aluminium tubes of the panel into the sliders and stopper. The tubes deliberately go in firmly, tips for this follow further down.
Angle Tensioners between the Rafters
This variant suits you if there is no fascia board and you fix to the side of timber or metal rafters. Galvanised iron brackets at both ends of the rafters take the screw hooks. For each panel you need two tensioner sets.
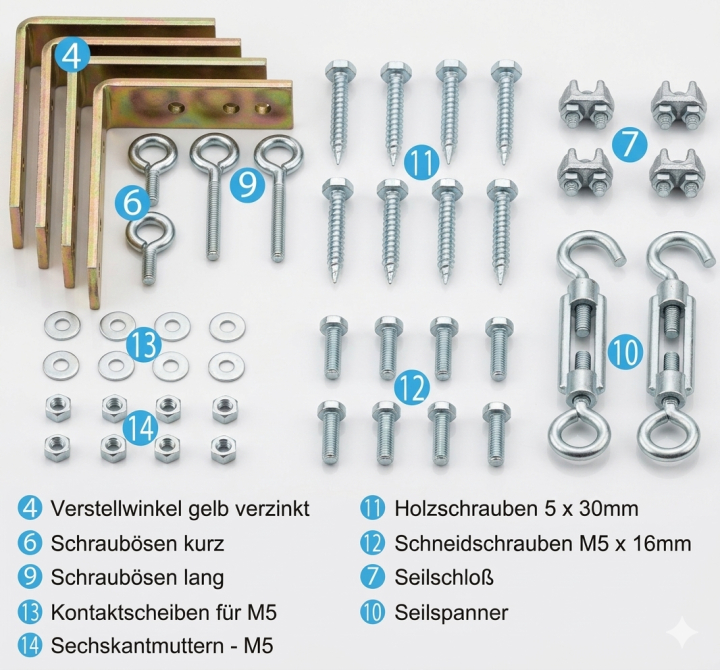
The Parts You Need per Panel
In addition to the cable, sliders and stoppers in the box:
- 4 iron brackets, galvanised, 2 at the front and 2 at the back
- 2 short screw hooks for the front brackets, 2 long ones for the rear
- 8 contact washers M5 and 8 hex nuts M5
- Wood screws 5 x 30 mm for timber rafters or self-tapping screws M5 x 16 mm for aluminium or metal rafters
- 2 tensioners with screw hook and eyelet, 4 cable clamps
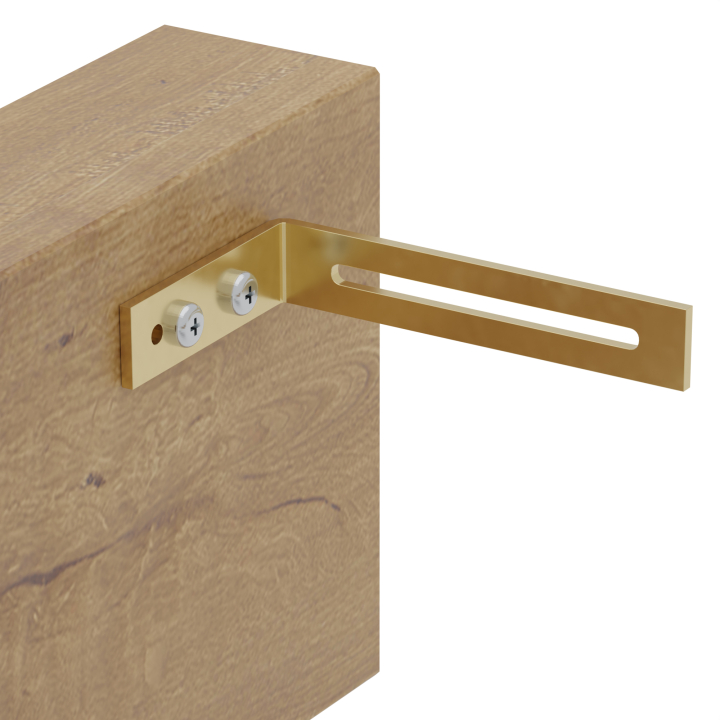
Screw the Iron Brackets to the Rafters
Fix one iron bracket at the front and one at the back to the side of the rafter. In timber use the wood screws. In aluminium or metal, pre-drill with 4.5 mm and fit the self-tapping screws, as without pre-drilling the material splits.
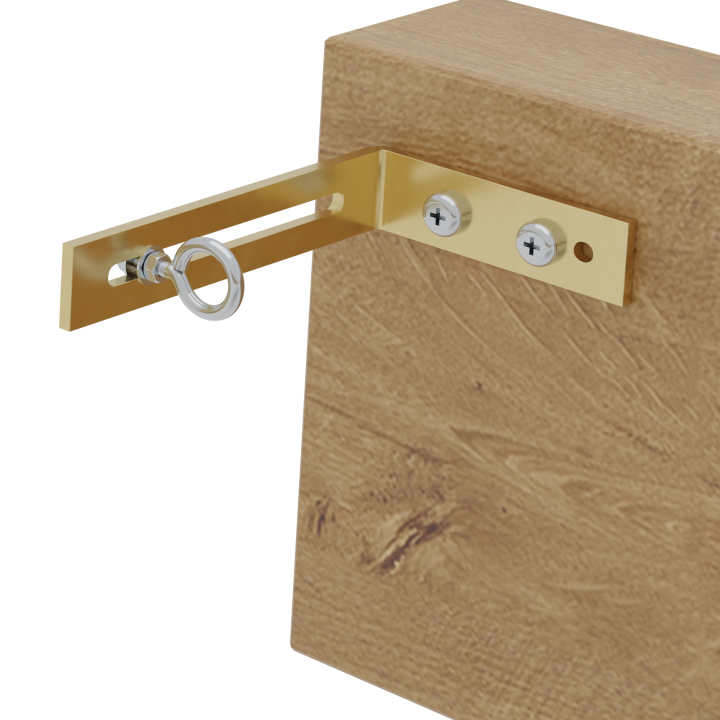
Short Screw Hooks at the Front
Fit the short screw hooks with contact washer and hex nut to the front brackets. The contact washers stop the nuts from working loose.
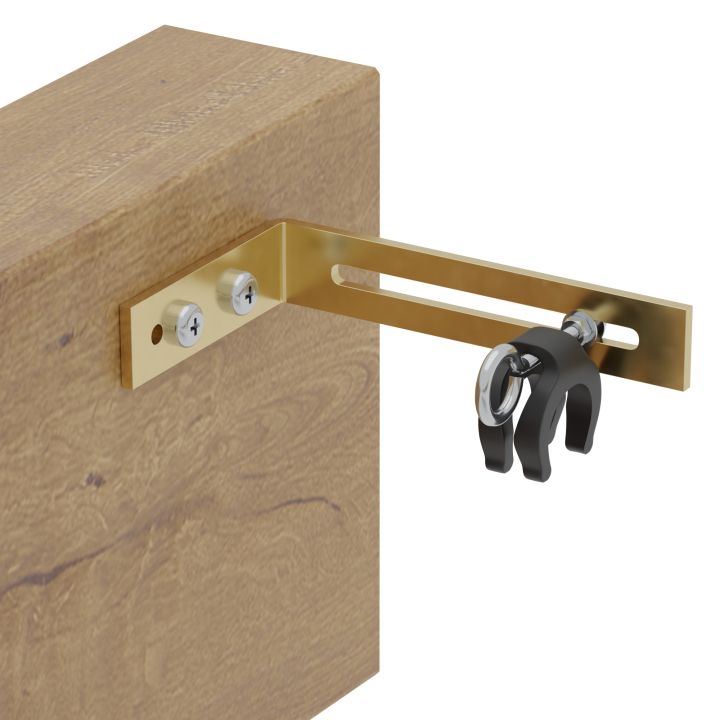
Long Screw Hooks at the Back, Slide On the Sliders
Fit the long screw hooks to the rear brackets and slide one slider onto each threaded rod straight away. It then already sits in the right place for the panel.
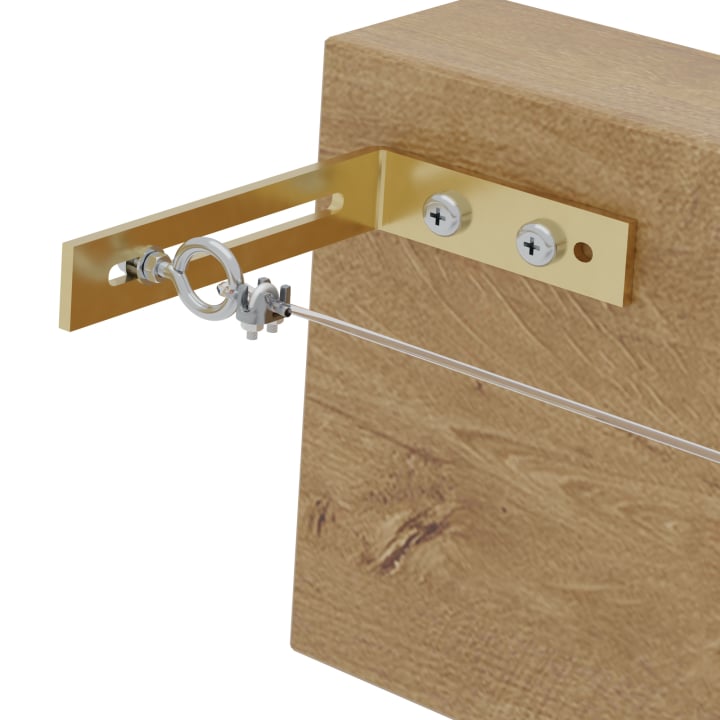
Attach the Fixed Cable End
Make a loop at the end of the cable, clamp it with a cable clamp and hang it in the front eyelet.
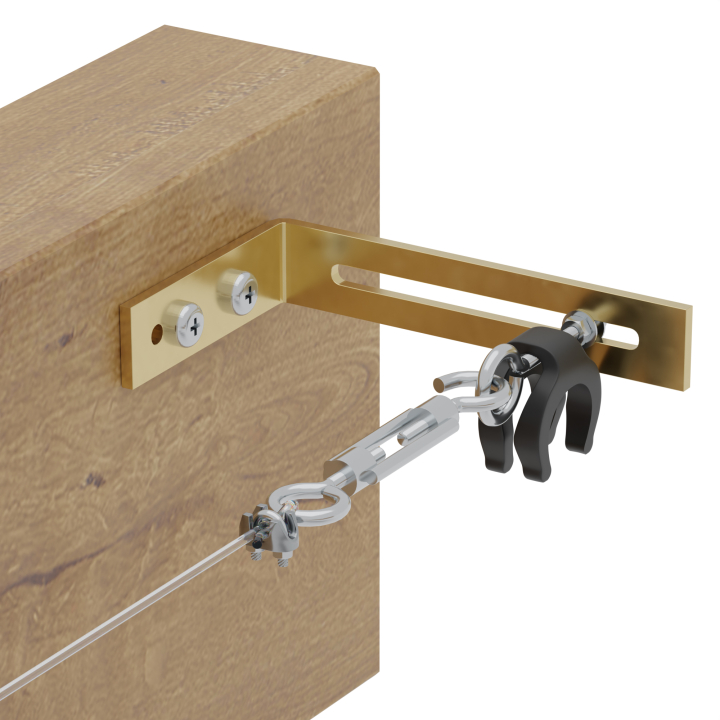
Hang the Tensioner and Tension
Turn the tensioner right open, lay the other end of the cable around its eyelet, line it up together with the cable clamp and only then cut. Hang the tensioner on the rear screw hook and turn it closed until the cable sits taut.
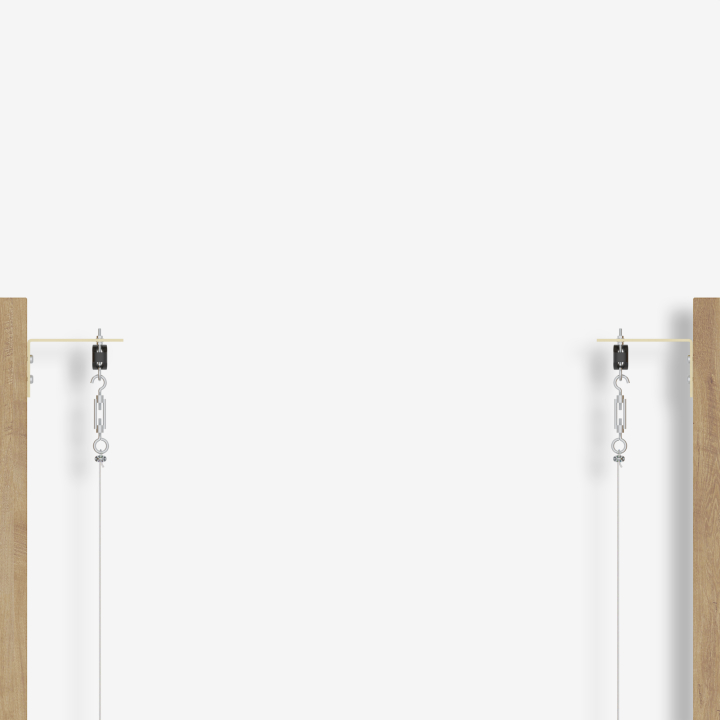
Same on the Other Side
Repeat steps 1 to 5 on the opposite rafter and check that both cables run parallel.
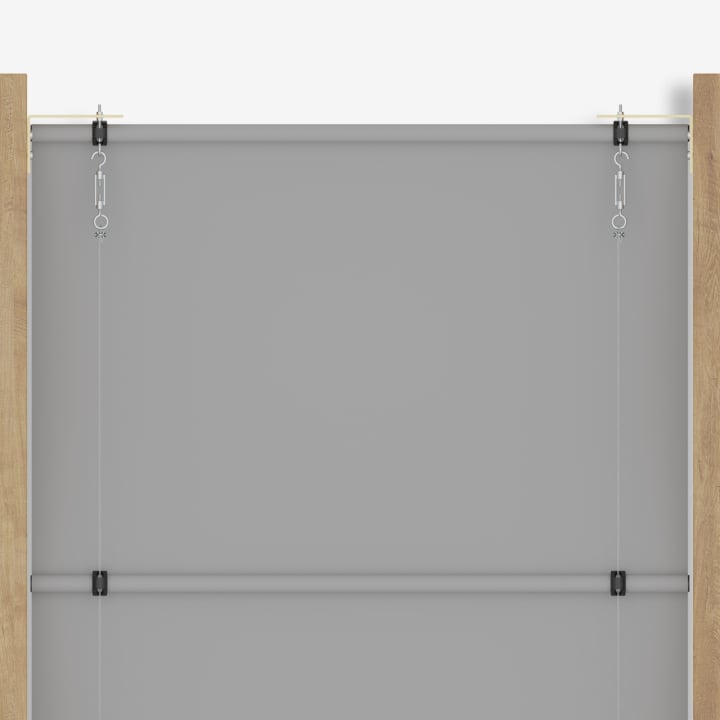
Pull On the Sliders and Hang the Panel
Pull the remaining sliders onto both cables, fix the stopper on the last aluminium tube and clip the aluminium tubes of the panel into the sliders and stopper.
Stainless Steel Tensioners between or under the Rafters
The stainless steel tensioner is compact and sits at the side of the rafter (between the rafters) or on its underside (under the rafters). When fitting from below, we recommend 3 cm clearance to the roof. For each panel you need two sets, one per side.
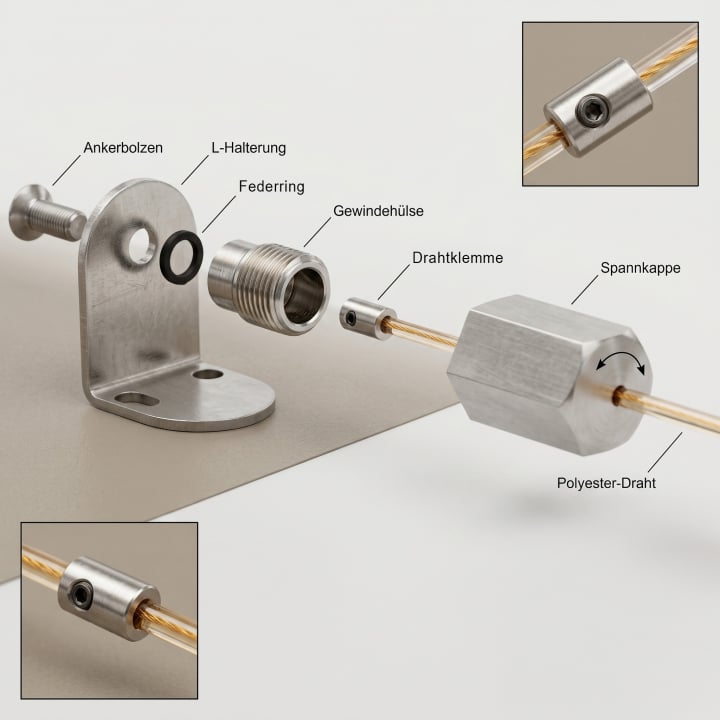
The Parts in One Set
A stainless steel tensioner set consists of:
- 1 stainless steel mounting bracket with 2 wood screws
- 1 countersunk screw with spring washer
- 1 threaded sleeve, screwed onto the countersunk screw
- 1 stop element that the cable runs through, with 2 grub screws, pre-fitted at the side at the factory
- 1 tensioning element, screwed onto the threaded sleeve
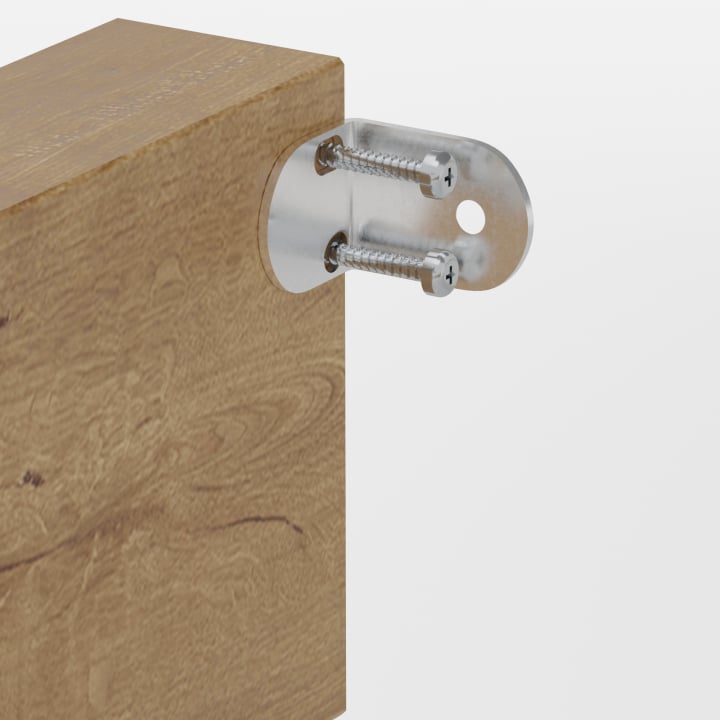
Fit the Mounting Bracket
Choose the position at the side or underneath the rafter and screw the bracket on with 2 wood screws. In aluminium or metal, pre-drill with 4.5 mm. A facade plate is also possible instead of the bracket.
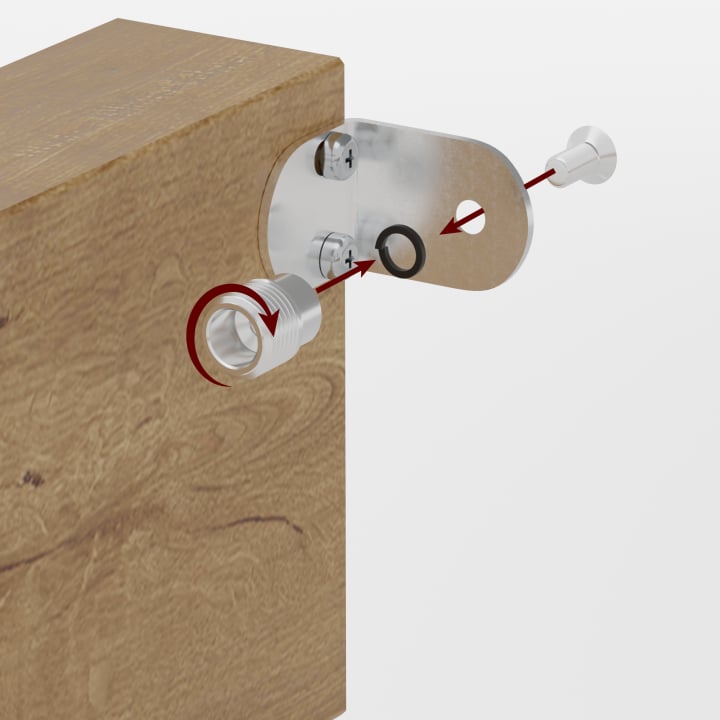
Fit the Countersunk Screw and Threaded Sleeve
Put the spring washer on the countersunk screw, pass the screw through the hole in the bracket and screw on the threaded sleeve.
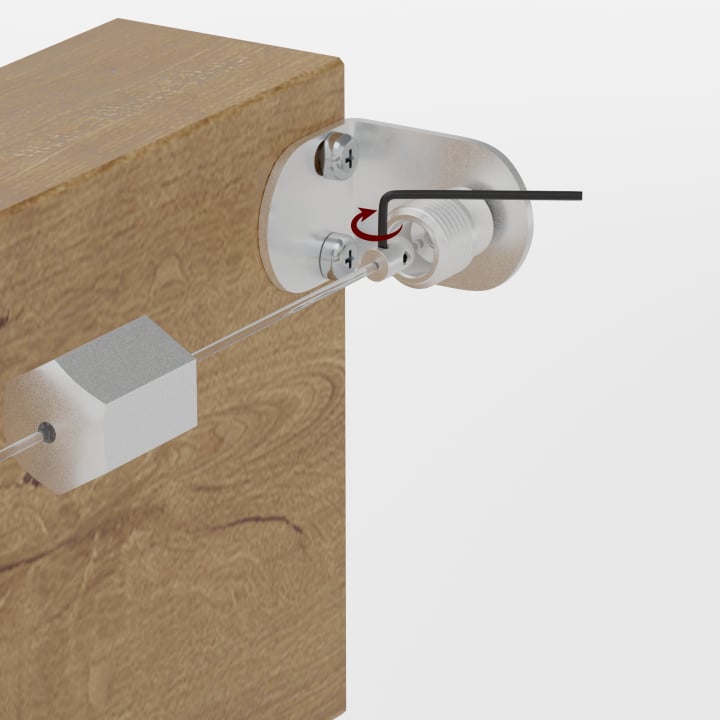
Clamp the Cable in the Stop Element
Pass the cable through the stop element and tighten both grub screws. They are offset so the cable also holds securely under load. On the opposite side, line up the cable first before you cut it.
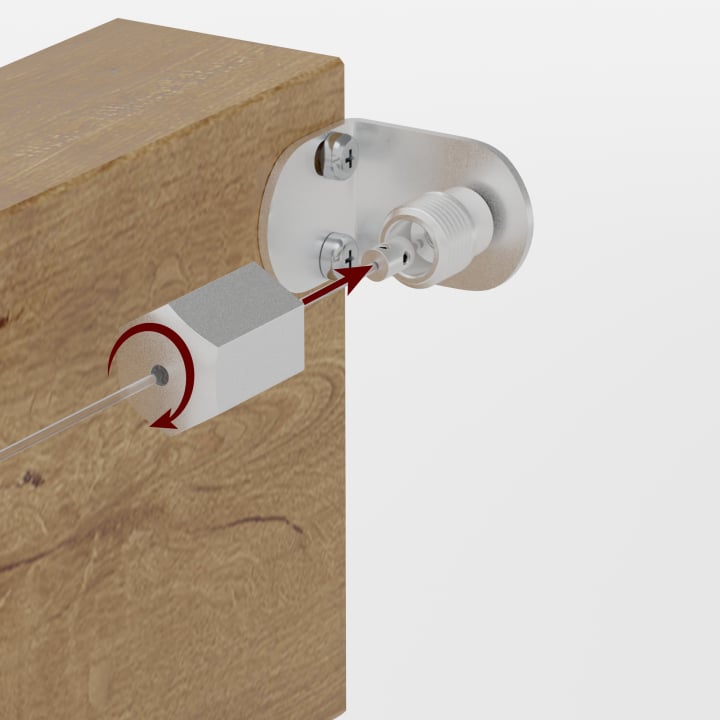
Screw On the Tensioning Element
Screw the tensioning element onto the threaded sleeve so that it encloses the stop element. This is how you tension the cable. Use the thread fully on both sides, then you keep a reserve for re-tensioning.
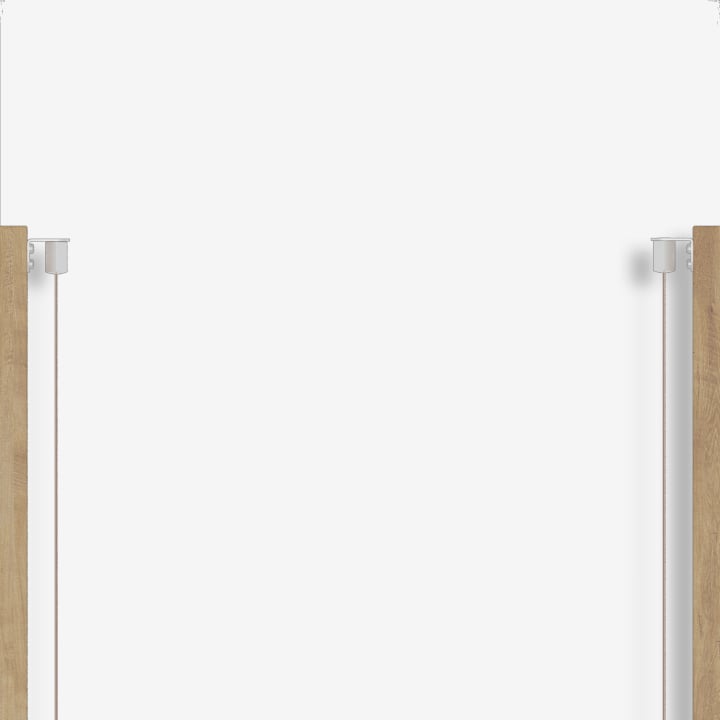
Same on the Other Side
Repeat steps 1 to 4 on the opposite rafter and check that the cables run parallel.

Pull On the Sliders and Hang the Panel
Pull the sliders onto both cables, fix the stopper on the last aluminium tube and clip the aluminium tubes of the panel into the sliders and stopper.
Installation Tips and Typical Mistakes
If the panel is already hanging, the cables can hardly be pulled taut any more and the panel sags. Set and tension all the cables first, then the panel goes on.
If a cable guide is missing, the panel sags in the middle. Use all of those that belong to your panel width. If that is not enough, we supply stainless steel cable, which can be tensioned tighter.
If you cut before lining up, you have no tensioning reserve left. Turn the tensioner right out, clamp one side, line up the other side together with the cable clamp, then cut.
That is intended, so nothing falls out. Rub the spot with a little soap and start with the angled corner. Or put the sliders and stopper into freshly boiled water for 5 minutes, which softens the plastic. With olefin, a denser fabric, clipping on is a little more awkward.
First check that the stoppers on the aluminium tube sit in the fabric fold. If that does not help, tighten a cable tie lightly on the last pair of sliders on the moving side. The slider must still stay movable, and you cannot see the cable tie from below.
If the cables run at an angle to each other, the sliders jam or the panel runs crooked. Measure the hook spacing on one side and transfer it exactly to the other.
An awning is not a storm or rain roof. In rain, strong wind and storms, retract the panel and park the fabric stack under the roof. If the fabric stays damp there for long, mildew spots can form. What helps is explained in Removing mildew spots from an awning. For normal care, read Cleaning an awning.
Slope: Across, Lengthways and the Cloud Strap
Two measurements are often confused: the cross slope of the surface in degrees and the roof slope in percent, which decides the look of the panel. Each has its own rules.
Cross Slope in Degrees
If the surface falls to the side, across the running direction of the panels, up to about 30 degrees is not critical. Between 30 and 45 degrees we check each case individually, usually with firm tension and stainless steel cable. We cannot promise reliable function then. From about 45 degrees we recommend a firmly tensioned made-to-measure sun sail.
Lengthways Slope with the Cord Pull System
If the panels run up the slope, for example on a glass roof between the rafters, gravity does not pull the panel sideways. The bunched-up stack is the difficult part, as it wants to slide down. The cord pull system helps here: an endless operating cord runs over pulleys above the panel. You move the panel from the ground and hold it in any position.
Stack at the Highest Point
On any installation with a slope, the fabric stack parks at the top. A stopper on the first aluminium tube holds it there. Parking at the low end is not provided for in the design.
Cloud Strap for Roof Slope
With the cloud look, the panel is about 5-7% longer than the tensioned span, so the fabric hangs between the cross tubes. On a slope the tubes slide downwards: the panel becomes tight at the top and sags deeply at the bottom. The cloud strap, two straps per panel sewn at the sides to every fabric pocket, keeps the tubes at an even spacing. The extra length stays the same. From about 7-8% roof slope, choose the cloud look only with a cloud strap, otherwise the taut look. In a windy spot the strap also helps without a slope.
Fitting Height over 3 m
You can reach the panel by hand up to about 2 m, and with the operating pole up to about 3 m. If the awning sits higher, for example under a conservatory roof, you operate it from the ground with the cord pull system. There is no motor for the cable awning, it is operated by hand.
Frequently Asked Questions
Sources
Last reviewed: 23.10.2026 · Reviewer: Germes-Team
Questions about installing your awning?
Send us a photo of your rafters and the spacings. We will tell you which fixing suits and which fixing kit you need.