





Fitting an awning yourself
what to check beforehand
You can fit a rope tension awning or a folding awning yourself if the surface carries the load and you are comfortable with a drill and a cordless screwdriver. Here you can read what to attach the awning to, which variant suits your rafters, which tools you need and when it is better to ask us first. The details come from our own production and from the questions customers ask us about installation.

Yes, fitting an awning yourself is doable if the design is made for it. Our rope tension awning runs on tensioned ropes, and the folding awning glides in two rails. Both come with the complete mounting kit. We do not make articulated-arm or cassette awnings, so for those the manufacturer's instructions apply. You can read which designs exist under What are awnings.
- Check the surface: rafters made of wood, aluminium or steel, a fascia board or the house wall. You check the structural requirements yourself beforehand.
- Choose the variant: for the rope tension awning there are three fixings - on the fascia board, with angle turnbuckles between the rafters, or with stainless steel turnbuckles between or under the rafters.
- Get your tools ready: drill, cordless screwdriver or screwdriver, hex key, folding rule. A tool set comes with the rope tension awning.
- Keep to the sequence: first fit and tension all the ropes, then hang the panels.
- Only shorten the rope on site once the turnbuckle is fully unscrewed. That leaves the full tensioning travel for retensioning.
- If the load capacity is unclear, send us a photo before you drill.
Fixing an awning to the wall or to rafters: the surface decides
Whether you fix the awning to the wall or to the rafters of a roofed structure, the fixing must hold the pull of the ropes permanently. You check the structural side yourself before installation. What holds on timber rafters is explained in detail under Attaching an awning to roof rafters.
House wall, end-on
On the house wall, stainless steel turnbuckles with a facade plate sit directly on the surface, so no mounting bracket is needed. With a taut look, the fabric bundle pushed together is more compact at about 21 to 23 cm than the 30 to 35 cm of the standard installation. The facade must hold the screws permanently.
Insulated facade
With external thermal insulation composite systems (ETICS) you need special ETICS anchors. They pass the load through the insulation into the masonry. Standard anchors only hold in the insulation and are not enough.
Plastic or composite facade
Whether a plastic or composite facade holds the screws, even when it is reinforced inside, cannot be judged from a distance. Clarify this before ordering, for example with the manufacturer of the facade.
Rafters made of wood, aluminium or steel
In wood you drive in wood screws. With aluminium and metal rafters you pre-drill with 4.5 mm, otherwise the material tears. On steel beams the turnbuckle can be screwed directly through the web, and the web thickness matters here.
Balcony and rented flat
If you rent, get the landlord's written consent before drilling. What applies on a balcony and under a ceiling is explained under Balcony awning with ceiling mounting.
Three fixing variants

Which fixing suits depends on your roof structure. Check whether there is a fascia board at the front and back and whether the awning should run between or under the rafters. The parts for each variant are included in the delivery.
- Fascia board (facade mounting): if there is a fascia board or a house wall at the front and back. For each panel you use 4 screw hooks, 2 turnbuckles and 4 rope locks.
- Angle turnbuckles between the rafters: if there is no fascia board. Galvanised iron angles sit on the side of both rafter ends, fixed with 5 x 30 mm wood screws or, for aluminium and metal, with M5 x 16 mm self-tapping screws.
- Stainless steel turnbuckles: on the side of the rafters (between) or on the underside of the rafter (under). When fitting from below, we recommend a distance of 3 cm to the roof. A facade plate also works instead of the angle.
- Between the rafters: invisible when closed, LEDs in the rafters remain usable, one panel per bay and about 8 drill holes.
- Under the rafters: visible, about 4 drill holes per bay and fewer panels, about 3 panels for 9 bays. Good if there is no room between the rafters, for example with an aluminium frame.
- Folding awning: the longitudinal profile is screwed to the rafters from below or to the side between the rafters, fixed every 60 to 80 cm.
What you need for installation
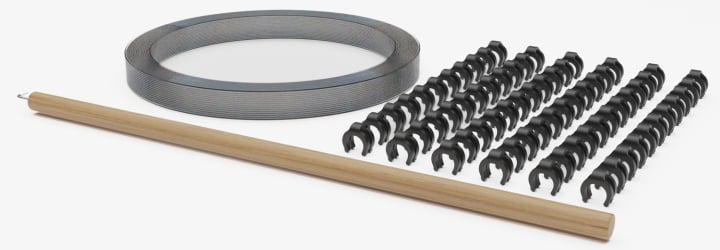
The complete mounting kit is included, and you do not need to order anything separately. We supply stainless steel wire rope only by arrangement, it is not a missing part. Your own tools complete the set.
- Drill, with a 4.5 mm bit for pre-drilling in aluminium or metal rafters
- Cordless screwdriver or screwdriver
- Hex key for the stoppers
- Folding rule or tape measure and a pencil for marking
- A safe ladder, optionally pliers and cable ties
- Rope tension awning: turnbuckles, polyester rope, sliders, stoppers, operating pole and GERMES tool set are included, and the aluminium tubes are already in the panels.
- Folding awning: longitudinal profiles, hook-and-loop profiles, sliders, stoppers and magnetic stopper set, plus stainless steel screws.
- You receive the installation instructions digitally as a PDF with the order confirmation or invoice.
Installing an awning - how to avoid the most common mistakes
You install an awning in a fixed sequence: first the brackets and all the ropes, then the panels. This lets you pull the ropes taut before any weight hangs on them. Rope tension awning installation shows every step of the three variants with pictures.
Panel hung before the ropes
If the panel is already hanging, the ropes can hardly be pulled taut any more and the panel sags. Fit and tension all the ropes firmly first.
Rope guide left out
Each panel needs 2 rope guides for a panel width under 145 cm, 3 from 145 cm and 4 from 300 cm. If one is missing, it sags.
Rope shortened too early
There is no formula for the rope length. Unscrew the turnbuckle fully, clamp one side, align the opposite side including the clamp and only then shorten.
Ropes not parallel
Set the hooks or angles at the same distance on both sides. If the ropes run at an angle to each other, the sliders jam.
Sliders are hard to push onto the tube
This is intended, so that nothing slips. A little soap helps, or you can put the sliders in freshly boiled water for 5 minutes.
Panel still sags
Stainless steel wire rope can be tensioned more tightly than the standard rope. We supply it only by arrangement, for example from a length of about 6.5 m.
When to fit it yourself and when to ask
You can install an awning with ropes yourself if you know the surface. In these cases we will help you further.
Fitting it yourself works
Timber or metal rafters, a fascia board or solid masonry, and the tools from the list above: then you fit the rope tension awning yourself.
Fixing unsure
With thin sheet metal, custom constructions or brackets with an unclear load, we will make a single panel first if you wish. You test it at your own responsibility, and if the fixing holds, the remaining panels follow.
Measurements only possible after installation
If the panels can only be measured reliably after the brackets are fitted, for example with a steel structure without a fascia board, we send the mounting material in advance against a deposit. You fit the brackets, measure the panels afterwards and tell us the measurements.
On-site measuring
Within 20 km of Westoverledingen, a colleague will measure on site if you wish. The appointment is chargeable, and we credit half of it against your order.
Commercial building projects
For commercial orders, our own fitters install on request, check the function and have an acceptance report signed.
Build it yourself instead of buying
If you want to sew and build the whole system yourself, you will find the plan under Making a rope tension awning yourself.
Operating, parking, caring
No storm or rain roof
An awning is sun protection, not a storm or rain roof. In rain, strong wind and storms you push it together. The fabric bundle then parks under the roof.
Park at the top on a slope
On a sloping roof, the fabric bundle parks at the highest point. A stopper on the first aluminium tube holds it there.
Operated by hand
You operate the rope tension awning and the folding awning by hand, without a motor and without electricity: you push the panels open when you need shade. The operating pole reaches up to about 3 m in height, above that a pull cord from the ground helps.
Caring for the fabric
How to clean the fabric is explained under Cleaning an awning. For dark spots, Removing mildew spots helps, and for a fresh water-beading effect see Waterproofing an awning.
New fabric for the old frame
When the fabric is worn out, the whole awning does not have to go. More on this under Re-covering an awning.
Order an awning made to measure
An awning that fits your rafters is the easiest to fit. We make to your measurements in Westoverledingen. You will find more topics in the Awning guide.
Rope tension awning
Slides on ropes, with fabric made of Dralon, Polysun, Agora or Olefin: Rope tension awning made to measure.
Folding awning
Runs in rails with hook-and-loop profiles, under or between the rafters. You will find it in the shop as a complete set made to measure.
Measuring correctly
Between the rafters the clear width counts, and under the rafters you measure from centre to centre. Everything else is under How do I measure a rope tension awning.
Frequently Asked Questions
Sources
- Awning guide
- Rope tension awning installation
- Rope tension awning made to measure
- Folding awning made to measure
Last reviewed: 23.10.2026 · Reviewer: Germes-Team
Questions about fitting your awning?
Send us a photo of your rafters or your house wall and the distances. We will tell you which fixing suits and what you need for it.