





How Do I Measure a Rope Tension Awning
Correctly?
For a made-to-measure rope tension awning you need two dimensions and one decision: the width between the fixing points, the length in the tensioning direction and the look you want. This guide shows you where to measure depending on the type of installation, which value to give and what we deduct ourselves in production. That way you enter your dimensions correctly, once, in the configurator.

You measure a rope tension awning in three steps. First you decide the type of installation, because that determines where you measure the width. Then you measure the length in the tensioning direction, and finally you choose the look. You do not calculate deductions yourself, our workshop takes care of that.
- Width: between the rafters, the clear dimension measured at three to four points, giving the smallest value. Under the rafters, from rafter centre to rafter centre.
- Length: the distance between the two tensioning points, including the rope tensioning device.
- Look: taut with no allowance, or cloud look with about 5 to 7 % fabric allowance. From about 7 to 8 % slope, the cloud look is only available with a cloud strap.
- Deduction: we make the aluminium tube including end caps 10 mm shorter than your width dimension. You give the full dimension.
Decide the Type of Installation and Measure the Width
A rope tension awning sits either between the rafters or under the rafters. That determines which dimension you give as the width. You measure a separate panel for each rafter bay.

Clear Dimension at Several Points
With installation between the rafters, what counts is the free distance between the two neighbouring rafters, that is the clear dimension. Rafters rarely run exactly parallel, so the distance varies at different points. This version is invisible from below, but needs about twice as many drill holes per bay.
- Depending on the length, measure at no fewer than three to four points.
- Give the smallest distance found as the panel width.
- Do not deduct anything yourself: the aluminium tube including end caps becomes 10 mm shorter, which leaves 5 mm of clearance to the rafter on each side.

From Rafter Centre to Rafter Centre
With installation under the rafters, the bay width is the distance from the centre of one beam to the centre of the next. This version needs fewer drill holes, but the construction stays visible when closed. If there is nothing to fix to between the rafters, for example with an aluminium frame, it is often the right way.
Measuring the Length in the Tensioning Direction

Give the Whole Tensioning Distance
You measure the length in the tensioning direction between the two tensioning points, for example from the house wall to the cross beam. You give the length including the rope tensioning device. In production we deduct a dimension depending on the rope tensioning device chosen, so that panel and rope tensioner together come out at exactly your dimension after installation.
- We make a panel up to 700 cm in length and up to 320 cm in width.
- With the cloud look you still give the tensioning distance, and we calculate the fabric allowance.
Choose the Look and Note the Slope
The look determines how much fabric we add to the length. On a roof with a slope, it also decides whether you need a cloud strap. We give the slope here as a percentage.

Taut Look
The panel lies taut and straight between the tubes and fits your dimension exactly. This look suits any slope.

Cloud Look
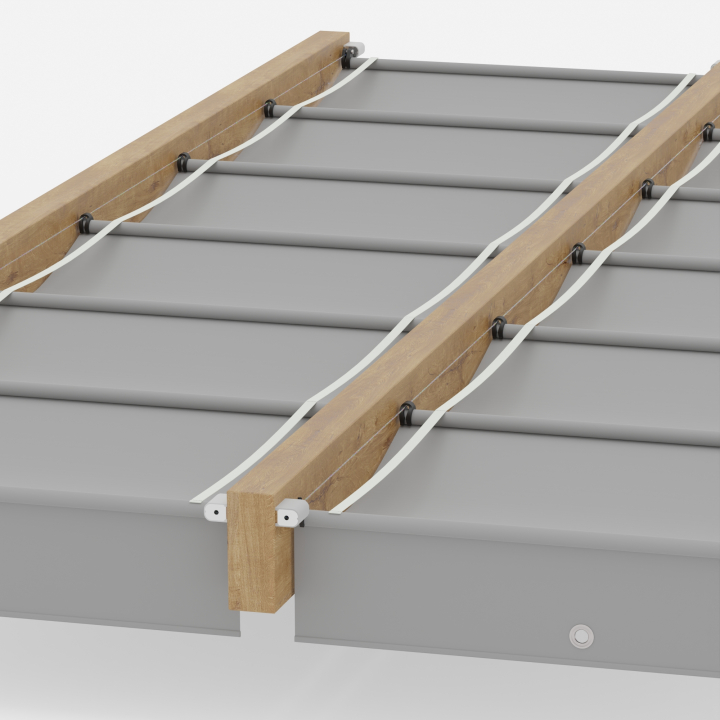
For the cloud look we add about 5 to 7 % fabric to the length. When extended, the sections sag by about 5 cm and form a soft wave.
Cloud Look with Cloud Strap
The cross tubes glide on the ropes. On a slope, gravity pulls them downwards: the panel becomes taut at the top and sags deeply at the bottom. Two straps at the sides of the panel are sewn to each fabric loop with a cross tube. They keep the tubes at an equal distance, however the roof is inclined. From about 7 to 8 % slope, the cloud look is only available with a cloud strap, otherwise you choose the taut look. Below that it usually works without a strap, but in a windy location it helps anyway.
Other Dimensions for Planning
These values result from the technology of the rope tension awning. You do not have to measure them, but you should know them before ordering.
Tube Spacing About 40 cm
When extended, the tubes of the panel are about 40 cm apart. The valance with the eyelet, which you use to pull the panel open and closed, is 15 cm high.
Fabric Bundle 30 to 35 cm
Pushed together, the panel needs about 30 to 35 cm of space. Allow for this depth for the parking position.
Distance from Rope to Rafter
With side rope tensioners the rope sits 2.5 cm from the rafter, with angle mounting 2 to 6.5 cm. With fascia board mounting the distance is free, as long as the panel hangs stably.
Divide Wide Areas into Panels
Each panel needs two rope guides under 145 cm width, three from 145 cm and four from 300 cm. Several narrower panels are easier to move by hand than one very wide one. On a roof with several bays, each bay gets its own panel.
Measure the Mounting Height Too
Up to about 2 m height you push the panel by hand, up to about 3 m with the operating pole. If the awning hangs higher, you operate it from the ground with a rope pull system.
Sketch Angled Bays
We make angled bays as a special panel. For this we need the clear length and width of each panel and an exact sketch.
Tolerances and Measuring Again Correctly
Textiles move. Small deviations are normal because of the material and are not a defect. You will find all values per product under Tolerances for made-to-measure products.
Panel Tolerance
For an awning panel, deviations of up to 0.5 cm in width and up to 2 cm in length are within tolerance. The panel is measured laid out flat.
Tube Shorter Than Your Dimension
If you measure the tube again, it is 10 mm shorter than your ordered width including end caps. This is intended: the plastic caps protect the rafters in case the panel does bump into them.
The Reference Is the Ordered Width
What counts is the width you entered in the configurator, not the tube or fabric dimension measured afterwards.
Entering Dimensions in the Configurator
With width, length and look, you configure your made-to-measure rope tension awning. Then you choose one of four fabrics: Dralon, Polysun, Agora or Olefin. You will find further topics in the awning guide.
Unsure About Measuring?
Send us a photo of your rafters and your dimensions via the Service Centre. If the brackets are not yet fixed, we calculate the larger possible width and reduce the price after the final dimension.
Ropes Already Installed?
Then measure the clear dimension between the existing brackets and deduct nothing. Production deducts the 10 mm for tube and caps. How to fit an existing system with new fabric is explained under Re-covering an awning.
Installation After Measuring
How to fit and tension the ropes, hang the panel and up to which cross slope the rope tension awning is suitable is explained under Installing a rope tension awning. If you would rather sew the panels yourself, you will find the plan under Making a rope tension awning yourself.
What a Rope Tension Awning Is
How it differs from other designs is explained under What are awnings.
Keeping It Clean Later
How to care for the fabric is explained under Cleaning an awning, and dark stains are covered in Removing mildew spots from an awning.
Measuring Other Products
Measure shade sails, cushions and other products correctly: all measuring guides at a glance.
Frequently Asked Questions
Sources
Last reviewed: 23.10.2026 · Reviewer: Germes-Team
Dimensions Ready? Configure Now
Enter width, length and look in the configurator. If you are unsure, send us a photo of your rafters with the dimensions, and we will check them before production.