





Balcony Awning with Ceiling Mounting
How the rope tension awning holds
Under a balcony ceiling you can fit a rope tension awning without arms and without a cassette: the panel runs on tensioned ropes that are fixed under the ceiling or head-on to the wall. What matters is that the ceiling and wall hold the tension permanently. Here you can read which fixing suits your balcony, what matters for the structure and what to clarify before you order.
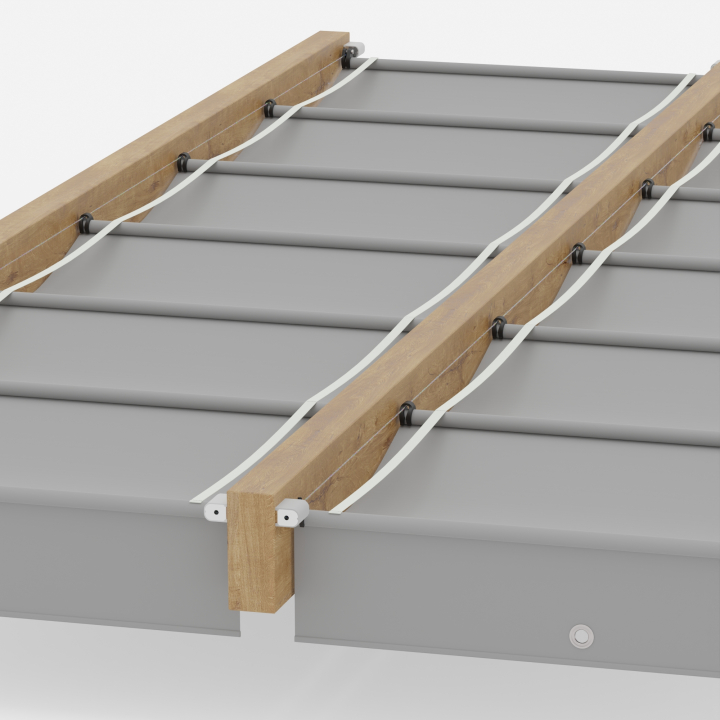
For us, an awning on a balcony with ceiling mounting is the rope tension awning. It needs no arms, but two firm points for its ropes, one at the front and one at the back. The balcony ceiling above protects the retracted fabric bundle.
- Fixing: the rope tensioners sit directly under the ceiling or head-on to the wall. Stainless steel tensioners with a facade plate are considered the most stable fixing.
- Structure: the ceiling or wall must hold the tension of the tensioned ropes permanently. Whether the material takes the screws securely cannot be judged reliably from a distance.
- Insulated facade: this needs ETICS anchors that carry the load into the masonry.
- Rented flat: get your landlord's written consent before drilling.
- Space: the retracted fabric bundle needs about 30 to 35 cm, or about 21 to 23 cm with wall mounting in the taut version.
- Operation: by hand with the operating pole, without a motor and without electricity. In rain, strong wind and storms you retract the awning.
Which Fixing Suits Your Balcony
If you search for ceiling mounting, you often come across articulated arm or cassette awnings. We do not make these designs. You can read what distinguishes them under What are awnings. For the rope tension awning, first clarify what the ropes will hang from.
Under the Balcony Ceiling
To mount an awning on the ceiling, the rope tensioners are screwed directly under the ceiling and the ropes run from front to back. The panel glides horizontally beneath. You decide during installation on which side the fabric bundle lies when retracted.
Head-On to the Wall
Instead of under the ceiling, the tensioners can sit on a vertical surface, on the house wall or an end face. We describe this wall mounting in the section further below.
Balcony with a Timber Roof
If your balcony carries a roof with rafters, the tensioners sit between or under the rafters. You can read what holds there under Fixing an awning to roof rafters.
Insulated Facade
On facades with ETICS insulation, standard anchors only hold in the insulation. Special ETICS anchors carry the load through the insulation layer into the load-bearing masonry.
Rented Flat
If you rent, get your landlord's written consent before any fixing to the ceiling, facade or railing.
Balcony Without a Ceiling
Without a ceiling, there is no sheltered place for the retracted fabric bundle. In that case an awning is often not the right solution. For the railing there is the made-to-measure balcony privacy screen, and Alternatives to an awning shows more options.
Will the Balcony Ceiling Hold the Awning?

When an awning is fixed to the balcony ceiling, the ceiling carries the tension of the tensioned ropes, every day and in every gust of wind. So it is not only the screw that matters, but the material it sits in. Whether a ceiling or a plastic or composite facade holds the screws permanently, we cannot judge reliably from a distance. This is how to proceed:
- Send a photo: send us a photo of the planned fixing points. We will then recommend the right type of installation for your situation.
- Confirm in writing: if we cannot assess the surface, confirm in writing before production that fixing is possible there.
- Test one panel first: if the situation is uncertain, we first make a single panel. You mount it at your own responsibility. If the fixing holds, we make the remaining panels.
- Your own brackets: if you use your own fixings, you do so at your own risk, without a guarantee from us. Telescopic poles from the balcony netting range are meant for light nets, and with several panels much higher forces act in the wind.
- If in doubt, have it checked on site: if you are unsure whether the ceiling or wall can carry the load, have a professional look at the fixing points.
Balcony Awning with Wall Mounting
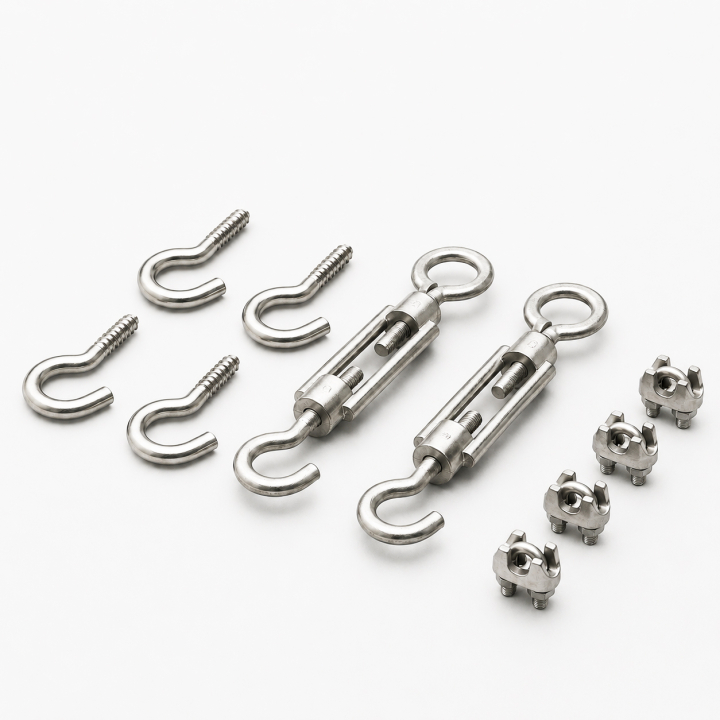
With wall mounting, the rope tensioners sit head-on, that is directly on the vertical surface of the house wall, facade or end face. A mounting bracket is not needed. Stainless steel tensioners with a facade plate spread the tension cleanly into the wall. Because the panel can run tauter here, the retracted fabric bundle is more compact: about 21 to 23 cm instead of 30 to 35 cm with standard mounting.
- The wall must hold the screws permanently. With plastic or composite facades, you confirm this in writing beforehand.
- On insulated facades ETICS anchors are used, as standard anchors are not enough.
- If a masonry projection hangs below the fixing, the fabric bundle has to be lifted over it when retracting. Clarify this before ordering.
- For a fascia board or facade, a mounting kit with 10 parts is included. For this you need a wall or a fascia board at both front and back.
What Is in the Box and How Installation Works
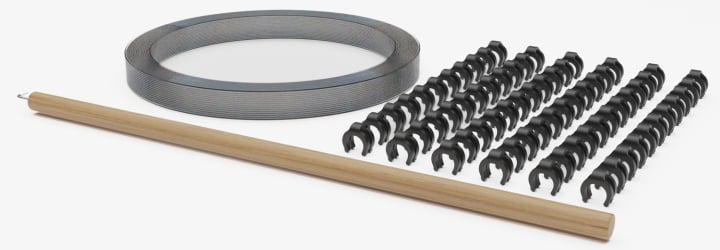
With the rope tension awning we supply the complete installation accessories, so you do not need to order anything separately. Installation follows a fixed order: first you fit all the rope tensioners and tension all the ropes firmly, and only then do you hang the panel. You will find the instructions for ceiling mounting of the awning with every step under Installing a rope tension awning.
- In the box: rope tensioners, glides, polyester rope, stoppers, operating pole, the panel with sewn-in aluminium tubes and a GERMES tool set.
- Mounting kit by situation: fascia board or facade mounting, angle mounting or stainless steel side rope tensioners that fit between rafters, under rafters or on the facade.
- Rope: polyester rope is standard. We supply stainless steel wire rope only by arrangement, for example from a length of around 6.5 m.
- Tools: drill and screwdriver.
- Operation: by hand with the operating pole, 80 cm long. For ceilings up to about 3 m high there is a telescopic pole as an extension.
Typical Mistakes When Mounting Under the Ceiling
Once the panel is hanging, the ropes can hardly be pulled tight any more. Fit and tension all the ropes first, then the panel follows.
If a rope guide is missing, the panel sags. Use all those that belong to your panel width: two under 145 cm, three from 145 cm, four from 300 cm.
Turn the rope tensioners all the way out, clamp the rope on one side and align the opposite side. Only then do you shorten the rope, so the full tensioning travel remains for re-tensioning.
The retracted fabric bundle belongs under the ceiling. It must not lie exposed to the weather.
Retracting, Re-Tensioning, Caring
Not a Storm or Rain Roof
The awning is pure sun protection, not a storm or rain roof. The panels are designed for wind up to about 30 km/h. In rain, strong wind, storms and severe weather you retract them. More under Leaving an awning out in the rain?.
Re-Tensioning
If the panel sags, re-tension the ropes using the thread of the tensioners. If the panel slides back by itself, a lightly tightened cable tie on the last pair of glides helps.
Caring for the Fabric
How to keep the fabric clean is explained under Cleaning an awning. Dark spots are covered in Removing mildew spots from an awning, and Waterproofing an awning brings back the water-beading effect.
Replacing Old Fabric
If your balcony already has an awning with tired fabric, read under Re-covering an awning what is worthwhile.
Ordering a Rope Tension Awning for Your Balcony
For your order you need two dimensions and the type of installation. We make the awning in Westoverledingen to your measurements, Made in Germany. You set everything together in the configurator for the made-to-measure rope tension awning. You will find further topics in the awning guide.
Measuring Width and Length
You give the width as the clear dimension between the mounting points, and the length as the tensioning distance between the two tensioning points. Where exactly to measure is shown in How do I measure a rope tension awning?
Balcony 3 m Wide
On a 3 m wide balcony with ceiling mounting you have two options: one panel of around 300 cm, which needs four rope guides, or two panels of around 150 cm each. Two narrow panels are easier to operate.
Taut or Cloud
The taut look lies flat and needs no allowance. With the cloud look the fabric sags between the cross tubes, so about 5 to 7 percent is added to the length.
Four Fabrics
You can choose from Dralon, Polysun, Agora and Olefin. Dralon and Agora come from Spain. Agora carries a 5-year guarantee on colour fastness, Polysun and Olefin 2 years. All four provide shade and are suitable for the rope tension awning.
Frequently Asked Questions
Sources
Last reviewed: 23.10.2026 · Reviewer: Germes-Team
Questions About Installation on Your Balcony?
Send us a photo of your balcony ceiling or wall and the dimensions. We will tell you which fixing suits and how the awning holds there.