





Fixing an awning to rafters
between or under the rafters
Under a patio roof, a pergola or a glass roof, the rafters carry the awning. How you fix an awning depends on two questions: do the rope tensioners sit between the rafters or underneath them, and what are your rafters made of? This page compares both ways using our rope tension awning as the example, gives the number of drill holes and shows how to measure for each type of installation. The details come from our production and from the questions customers ask us about fixing.

Yes, you can fix an awning to rafters. With the rope tension awning, ropes run from rafter end to rafter end and the fabric panels slide along them. The most important points for installation, in five items:
- Between the rafters: the tensioners sit on the side of the rafter. When closed, the awning is invisible and lights in the rafters stay clear. In return you need around 8 drill holes per rafter bay.
- Under the rafters: the tensioners sit on the underside of the rafter. The awning stays visible and covers the lights, but around 4 drill holes per bay are enough and you need fewer panels.
- Tensioners: the rope tensioners suit both ways. On steel beams they can also be screwed directly through the web.
- Narrow rafters: if two panels are to hang on the same rafter, two tensioners of 28 mm width each need room side by side. On a rafter 6 cm wide, that is tight.
- Measuring: between the rafters, give the clear inner dimension; under the rafters, give the dimension from rafter centre to rafter centre.
Between or under the rafters: the comparison
Which type of installation suits you is decided by appearance, lights and the number of drill holes. Most customers choose installation between the rafters. Even so, work out the drill holes beforehand: on a pergola with 9 rafter bays, that is 9 x 8 = 72 holes between the rafters.
| Feature | Between the rafters | Under the rafters |
|---|---|---|
| View of the closed awning | invisible | visible |
| Lights in the rafters | stay usable | are covered |
| Drill holes per rafter bay | around 8 | around 4 |
| Number of panels | one per rafter bay | fewer, for example 3 panels for 9 bays |
| Position of the mounting bracket | on the side of the rafter end | on the underside of the rafter, 3 cm clearance to the roof recommended |
| Suitable if | the rafters are deep enough | the ceiling should look flat or the rafters are too shallow for installation in between |
| Width for the order | clear inner dimension between the rafters | centre of rafter to centre of rafter |
Which fixing suits your rafters
A tensioned rope pulls permanently on its fixing point. That is why it matters what your structure is made of and how much room it offers. If in doubt, send us a photo of your rafters and we will recommend the right type of installation.
Timber rafters
On timber, the stainless steel rope tensioner sits on a timber mounting plate. You screw the mounting bracket on with two wood screws.
Aluminium or steel rafters
On a metal frame, you screw the stainless steel rope tensioner directly to the profile and the mounting plate is not needed. Pre-drill with a 4.5 mm bit. On steel beams the screw can also go directly through the web, so watch the web thickness.
No room between the rafters
If an aluminium frame does not allow installation between the rafters, put the stainless steel tensioners on the underside of the rafters.
Steel beams without a fascia board
If the structure has only two beams about 3 m apart, the awning can be installed crosswise. The four rope guides then sit on four rafters below, and the panel moves sideways instead of back and forth.
Facade instead of rafters
If the rafters cannot carry the load or you do not want to drill there, the awning can be fixed to the front edge or to the facade. There the mounting bracket is not needed, and at about 21 to 23 cm the fabric bundle is more compact. On insulated facades you need special ETICS anchors that pass the load into the masonry. More on the wall under installing an awning yourself.
Under a balcony
If the awning is to go on the ceiling under a balcony, read awning on a balcony with ceiling mounting. That page also covers the structural side.
Rented flat
If you rent, get the landlord's written consent before drilling.
Rope tensioners instead of a rafter bracket: what is in the set
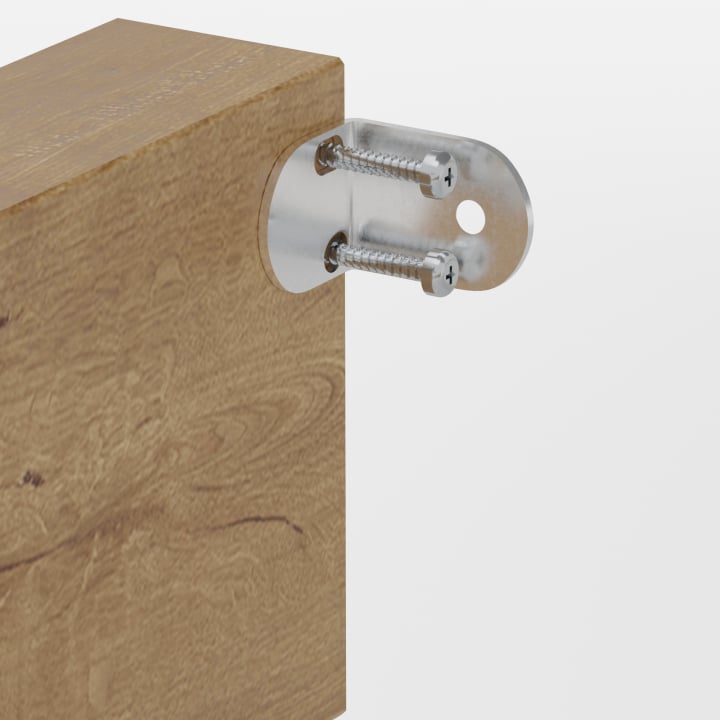
With the rope tension awning you do not have to build a rafter bracket for the awning yourself. It comes with the complete installation accessories, and on the rafter the mounting bracket of the rope tensioner holds it. You do not have to order anything separately.
- Two rope tensioner sets per panel, one for each side of the rafter. A stainless steel set consists of a mounting bracket, two wood screws, a countersunk screw, a spring washer, a threaded sleeve, a stopper element with two grub screws and a tensioning element.
- For angle installation between the rafters there is a set with galvanised iron brackets: wood screws 5 x 30 mm for timber, self-tapping screws M5 x 16 mm for aluminium and metal.
- Polyester rope with 1,800 N tensile load as standard, plus sliders, stoppers and an operating pole.
- We supply stainless steel wire rope only by arrangement, from a length of around 6.5 m.
- Tools: drill, for aluminium or metal with a 4.5 mm bit for pre-drilling, cordless screwdriver or screwdriver, Allen key and a tape measure.
How to measure for each type of installation
Which width you give depends on the type of installation. How to determine length and appearance is shown in the guide How do I measure a rope tension awning.

The clear dimension
You give the free distance between two rafters. Rafters rarely run completely parallel, so the dimension differs at different points.
- Measure at three to four points and give the smallest value.
- We make the aluminium tube including end caps 10 mm shorter than your dimension. That leaves around 5 mm play on each side, and the plastic caps protect the rafters from scratches.

From centre to centre
Under the rafters, the bay width is the distance from the centre of one rafter to the centre of the next.
- The number of rope guides per panel depends on the panel width: under 145 cm two, from 145 cm three, from 300 cm four.
- You give the length including the rope tensioning device. We deduct the allowance for the tensioners in production.
What to watch on the rafter
Many people only notice the number of holes during assembly. Count your rafter bays beforehand and allow around 8 drill holes per bay between the rafters.
A photo of the underside of the rafter shows only roughly whether two brackets of 28 mm each fit side by side. You only know for sure when you hold the tensioners up on site.
If it is unclear whether sheet metal, a home-made structure or a bracket will carry the tensile force, we first make a single panel. You test it at your own responsibility. If the fixing holds, we make the remaining panels.
First set and tension all the ropes and use all the rope guides, otherwise the panel sags. Only then do you hang the panel. All the steps are shown in installing a rope tension awning.
With the side rope tensioners, the rope runs 2.5 cm beside the rafter; with angle installation, 2 to 6.5 cm.
Retract, park, re-tension
Not a storm or rain roof
An awning is pure sun protection, not a storm or rain roof. In storms, bad weather and rain, push the panels together.
Park the fabric bundle under the roof
With four panels, the pushed-together fabric bundle is about 30 to 35 cm deep. Park it under the roof. On a slope it belongs at the highest point, and a stopper on the first aluminium tube holds it there.
Re-tensioning
When tensioning, use the thread of the stainless steel tensioners fully on both sides. That leaves reserve for re-tensioning.
Looking after the fabric
How to keep the fabric clean is explained under cleaning an awning. Against dark spots, removing mildew spots helps, and for water repellency, reproofing an awning.
New fabric
If the fabric is worn out after years, read re-covering an awning to see how it is done.
Order a made-to-measure rope tension awning
We sew every rope tension awning in Westoverledingen to your measurements. You can find more topics on sun protection in the awning guide.
Rope tension awning
Single-panel up to 320 cm width and 700 cm length, with a choice of four fabrics: Dralon, Polysun, Agora and Olefin. Made-to-measure rope tension awning
Your details
For the order you need the type of installation, the width per bay and the length. You also choose the look: taut or as a cloud.
Types at a glance
Which awnings there are and what distinguishes them is explained under What are awnings.
No rafters available
A rope tension awning needs a structure where the ropes can be anchored. If you do not have one, alternatives to an awning shows other ways to get shade.
Shade sail on the rafter
A rope-tensioned shade sail hangs in a similar way from the rafters, see fixing a shade sail to rafters.
Frequently Asked Questions
Sources
- Installing a rope tension awning
- How do I measure a rope tension awning
- Awning guide
- Made-to-measure rope tension awning
Last reviewed: 23.10.2026 · Reviewer: Germes-Team
Do your rafters carry the awning?
Send us a photo of your structure from below and the dimensions of the bays. We will recommend the right type of installation and the matching set.