





Shade sail installation guide
tensioned firmly in six steps
You put up a shade sail in a fixed order: first the fixings, then the carabiners and turnbuckles, and the sail last. This guide takes you step by step through installing a fixed, tensioned sail and shows which parts belong to which type and which tools you need. The information comes from our production and from the questions customers ask us about installation.
How you put up a shade sail depends on the type. A fixed, tensioned shade sail hangs from three or four points and is tensioned across its corners. A rope tension shade sail runs on two support cables and can be slid to the side. For both, the same rule applies: fixings first, then the sail.
- Check the points: masonry, concrete or a post in a point foundation will take the tensile load. A gutter and a trellis will not.
- Measure the distance: between the sail corner and the point sit the carabiner and turnbuckle. Add 30 to 50 cm per corner, so the points are further apart than the sail is large.
- Set one corner lower so that rain runs off.
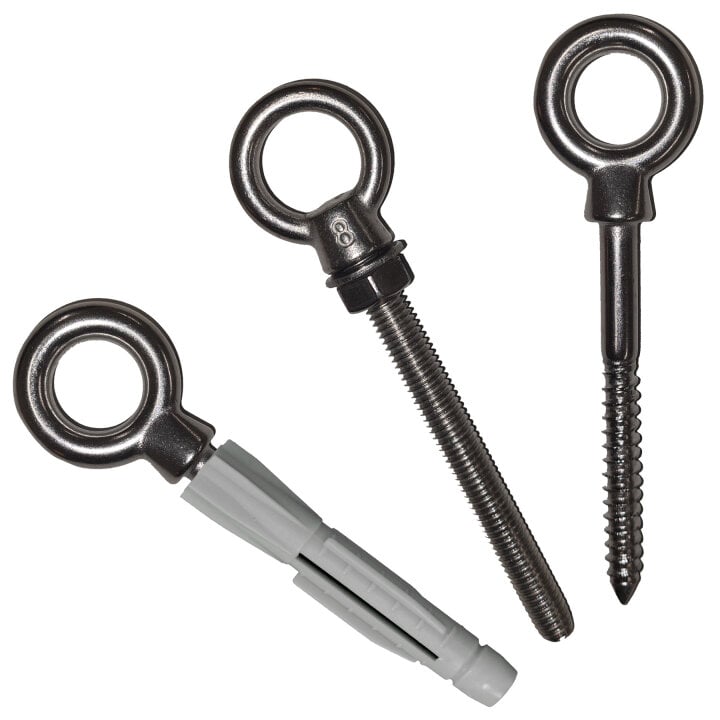
- Set the fixings: in masonry and concrete use expansion anchors with a wall eye, and on solid wooden posts use fixing material for wood.
- Hook in and tension: hang the carabiner and turnbuckle in the stainless steel rings of the corners and tension diagonally until no wrinkle remains.
- Rope tension shade sail: first set and tension both support cables, then hang the sail with the runner hooks. The fitting accessories, including the operating pole and sliding brakes, are included.
Which fixing suits your situation
Before you drill a hole, work out what the sail will hang from. That decides which type suits. You will find an overview of all the ways to fix a sail at fixing a shade sail.
Under a pergola or patio roof
The rope tension shade sail suits here. The stainless steel cable tensioners sit between the rafters or visibly under them. What holds on a rafter is explained in fixing a shade sail to roof rafters. Which other points on the patio will carry the load is covered in fixing a shade sail on the patio.
Without a roof
If there is no roof, we recommend stainless steel tensioners with a façade plate for the rope tension shade sail. The plate spreads the tensile load into the façade, which the screws must hold permanently. In bad weather and rain, the retracted sail must then lie under a shelter. If you have no such space, take it down beforehand. It does not replace a roof, and without a roof you use it at your own risk. More at fixing a shade sail to the house wall.
Free points for a fixed sail
A fixed, tensioned sail needs points that can carry the load: masonry, concrete or posts set in concrete. A gutter and a trellis will not hold the tensile load.
No post available
If a point is missing, a mast can replace it. How to set a mast is explained in building a shade sail mast yourself.
Balcony and rented flat
On a balcony you can often manage without a new hole, see shade sail on a balcony without drilling. If you rent, get the landlord's written consent before drilling into the façade.
Two types and their parts
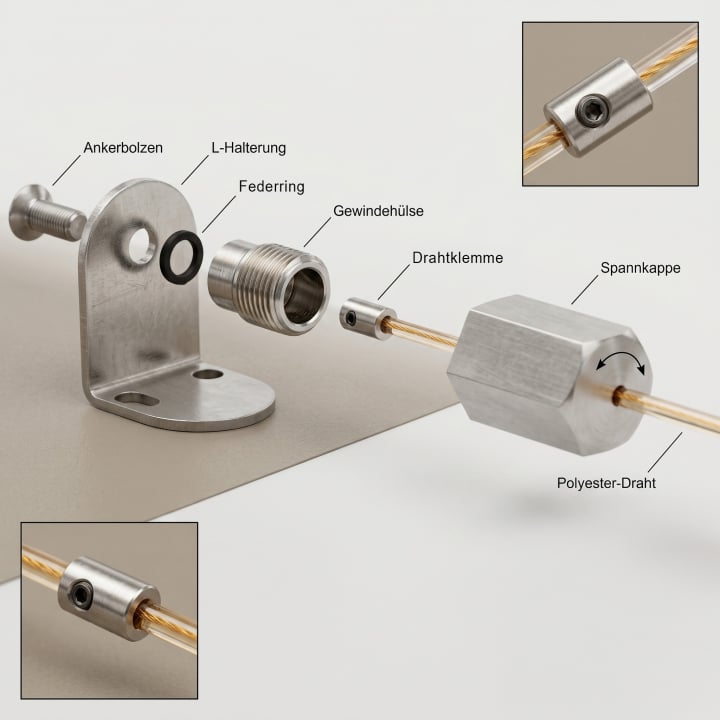
Which parts you need depends on the type. The fixed, tensioned sail has no mechanics, while the rope tension shade sail comes with a whole set of cables and tensioners. For the rope tension shade sail we supply the complete fitting accessories, so you do not have to order anything separately.
- Fixed, tensioned sail: in every corner sits a stainless steel fixing ring. Added to this, for each corner, are a carabiner and a turnbuckle, plus the fixing to the wall or post. If you have no posts, there is a complete set with sail, masts and fixing material.
- Rope tension shade sail: two stainless steel cable tensioner sets, polyester rope as standard, runner hooks, rope stoppers, sliding brakes and operating pole. An aluminium reinforcing tube sits in the front hem.
- We supply stainless steel wire rope for the rope tension shade sail only by arrangement, for example from a length of around 6.5 m.
- If you are missing runner hooks, we will send up to 10 more free of charge.
- Tools: a drill for anchors and wall plugs, a folding rule or tape measure. For the rope tension system also a cordless screwdriver or screwdriver, a hex key, a pencil and a cross-head screwdriver.
- No printed instructions come with the rope tension shade sail, and you can find the steps online.
Put up a fixed, tensioned shade sail in six steps
Decide on the points
Choose three or four points that can carry the load: a house wall of masonry or concrete, posts set in concrete or a mast in a point foundation. Keep about 30 cm away from house corners.
Measure the distances
Measure between the points. Add 30 to 50 cm per corner for the carabiner and turnbuckle. A sail with a 4 m edge therefore needs 4.6 to 5.0 m between the points.
Plan the slope
One corner sits lower: 25 to 30 cm of height difference per metre along the diagonal, so that rain runs off.
Set the fixings
In masonry and concrete use expansion anchors with a wall eye, and on solid wooden posts use fixing material for wood. On insulated façades, standard wall plugs only hold in the insulation, so special plugs are needed that carry the load into the masonry.
Hook in the corners
Hang a carabiner in each stainless steel ring, and the turnbuckle sits between the corner and the fixing point. First hook in all the corners loosely.
Tension diagonally
Tension diagonally, corner against corner, until no wrinkle remains. After a few days check the tension and retighten if needed.
Putting up a rope tension shade sail

Installing shade sails on cables follows its own order. You install a rope tension shade sail in two parts: first you set and tension the two support cables with the stainless steel cable tensioners, then you screw the runner hooks to the hem seam and clip the sail onto the cable. At the back, rope stoppers hold the hem, and at the front the sliding brake. Every step with pictures is shown in tensioning a shade sail.
Typical mistakes during installation
If the points are exactly as far apart as the sail is large, there is no room for the carabiner and turnbuckle. Add 30 to 50 cm per corner.
A gutter and a trellis will not hold the tensile load of a fixed, tensioned sail. Use masonry, concrete or posts set in concrete.
A sail tensioned level collects rain, and pockets of water form. Plan the low corner in when you set the points.
If you tighten one corner fully before the others are hooked in, you get wrinkles. First hook in all the corners loosely, then tension diagonally.
With the rope tension shade sail, the cables are hard to pull taut once the sail is hanging. Set and tension both cables first.
Sliding together, retensioning, taking down
Not a storm or rain roof
A rope tension shade sail is pure sun protection, not a storm or rain roof. In rain, strong wind and storms, you slide it together. Without a roof over it, the retracted sail must then lie under a shelter. If you have no such space, take it down beforehand. It does not replace a roof, and without a roof you use it at your own risk.
Retensioning
If the tension slackens, retighten the turnbuckles diagonally on the fixed sail. On the rope tension system, use the thread of the stainless steel tensioners fully on both sides, and then you keep some in reserve.
Fixed sail through the season
You hang a fixed, tensioned sail in spring, as soon as no more night frosts are expected. Take it down before the first autumn storm, and in between whenever a storm is forecast.
Taking down and storing
Before winter, take the fixed sail down, let it dry and store it dry. How to clean it beforehand is explained in cleaning a shade sail.
For nurseries and administrations
For institutions we offer a seasonal service: dismantling and inspection in autumn, dry storage with cleaning over the winter, refitting with an acceptance report in spring.
Order a made-to-measure shade sail
A sail that fits your points is the easiest to put up. We sew to your measurements in Westoverledingen. You will find more topics in the shade sail guide.
Fixed, tensioned shade sail
Triangle, square, rectangle or trapezoid, in standard sizes or made to measure: made-to-measure shade sail.
Rope tension shade sail
Slides on two support cables, with complete fitting accessories: made-to-measure rope tension shade sail.
Measure correctly
For the rope tension shade sail, measure the width between the rafters at three to four places and give the largest value. The measuring guide is on the product page.
Taut or wavy
You decide the look of the rope tension shade sail when you order: taut with about 20 cm between runner hooks, wavy with about 30 cm.
Sewing it yourself
If you build your own sail, you need outdoor fabric in extra width. Agora Liso comes in 320 cm width, Agora Air in 300 cm. That lets you make large sails without a centre seam. Read the whole plan at making a shade sail yourself.
Frequently Asked Questions
Sources
Last reviewed: 23.10.2026 · Reviewer: Germes-Team
Questions about putting up your sail?
Send us a photo of your rafters or fixing points and the distances. We will tell you which sail suits them and how to fit it.