





Fixing a Shade Sail to Roof Rafters
between or under the rafters
Under a pergola or a patio roof, the rafters carry the shade sail. You have two options: the rope tensioners sit at the side between the rafters, or underneath them. Here you can read what separates the two options, how many holes you need to drill and what applies to rafters made of wood, aluminium or steel. The figures come from our production and from the questions customers ask us about fixing.

A rope tension system usually hangs from roof rafters: two or more ropes run from rafter to rafter, and the sail or fabric panel slides along them. Here are the key points for fixing at a glance.
- Between the rafters: invisible when closed, and any lights in the rafters stay free. For the rope tension awning, this takes around 8 holes per bay.
- Under the rafters: visible, but for the rope tension awning it takes only around 4 holes per bay and fewer panels.
- The tensioners suit both options: galvanised steel rope tensioners and stainless steel rope tensioners work between and under the rafters, and on steel beams also directly through the web.
- Two panels on one rafter: two tensioners of 28 mm each have to fit side by side, which gets tight on a rafter 6 cm wide.
- Taking measurements: between the rafters, take the clear inside width; under the rafters, measure from the centre of one rafter to the centre of the next.
Between or Under the Rafters?
The table shows the differences using the rope tension awning, which prompts most of our follow-up questions. On a pergola with 9 rafter bays, that makes 9 x 8 = 72 holes between the rafters. Plan for this before you buy. All three ways of fixing the rope tension awning are shown on the page Installing a rope tension awning, and the awning on the rafters in detail on the page Fixing an awning to roof rafters.
| Feature | Between the rafters | Under the rafters |
|---|---|---|
| View when closed | invisible | visible |
| Lights in the rafters | stay usable | covered |
| Holes per bay (rope tension awning) | around 8 | around 4 |
| Number of panels | one per rafter bay | fewer, for example 3 panels for 9 bays |
| Position of the mounting bracket | at the side of the rafter end | underneath the rafter, 3 cm distance from the roof recommended |
| Measurement for the order | clear inside width between the rafters | centre of rafter to centre of rafter |
Fixing a Shade Sail to the Roof: What Takes the Tension?
A tensioned rope pulls constantly on its fixing point. That is why it matters what your structure is made of. If in doubt, send us a photo of your rafters and we will recommend the right way to install it.
Wooden rafters
On wood, the stainless steel rope tensioner sits on a wooden mounting plate as an adapter. The mounting bracket is fixed with two wood screws.
Rafters made of aluminium or steel
On metal frames, you screw the stainless steel rope tensioner directly to the profile, and the mounting plate is not needed. Pre-drill with 4.5 mm, otherwise the material will crack. On steel beams, you can also screw directly through the web, but pay attention to the thickness of the web.
No space between the rafters
If the frame does not allow fitting between the rafters, for example with an aluminium frame, you fix the stainless steel tensioners underneath the rafters.
Fixing a shade sail on top of the roof? Only via the rafters
Roof tile hooks, as you know them from solar panel installations, are stable in principle. For a rope tension system they only come into question if they are screwed into the roof rafters and do not just rest on the tiles. You use such DIY solutions at your own risk, and we give no warranty for them. Gutters and sheet metal do not carry the tension.
Long span without rafters
If continuous rafters are missing over 6 to 10 m, there is a special solution: a freely tensioned stainless steel wire rope between two eye bolts. It sags more than a rope between rafters and is advised on individually, with photos, details of the surface and a sketch.
Facade instead of rafters
If the rafters cannot carry the load or you do not want to drill into them, the rope can be fixed end-on to the house wall. With facade plates, the rope tension shade sail also works entirely without a roof over it. In that case, the gathered sail has to be stored under cover in rain and bad weather. If you have no such space, take it down beforehand. It does not replace a roof, and without a roof you use it at your own risk. How this works is explained under Fixing a shade sail to a house wall.
No rafters within reach
For a fixed, tensioned sail with three or four corners, read Fixing a shade sail, and for the patio Fixing a shade sail on a patio.
What Comes with It and What You Need Yourself

The rope tension shade sail and the rope tension awning come with the complete installation accessories. With the rope tension shade sail, this includes rope tensioners, polyester rope as the standard rope, slide brakes and the operating pole. The runner hooks are sent on afterwards.
- Drill, with a 4.5 mm drill bit for pre-drilling on rafters made of aluminium or metal
- Screwdriver or cordless screwdriver and Allen key
- Tape measure, which measures the full width between the rafters more accurately than a folding rule
How the Rope Tensioner Sits on the Rafter
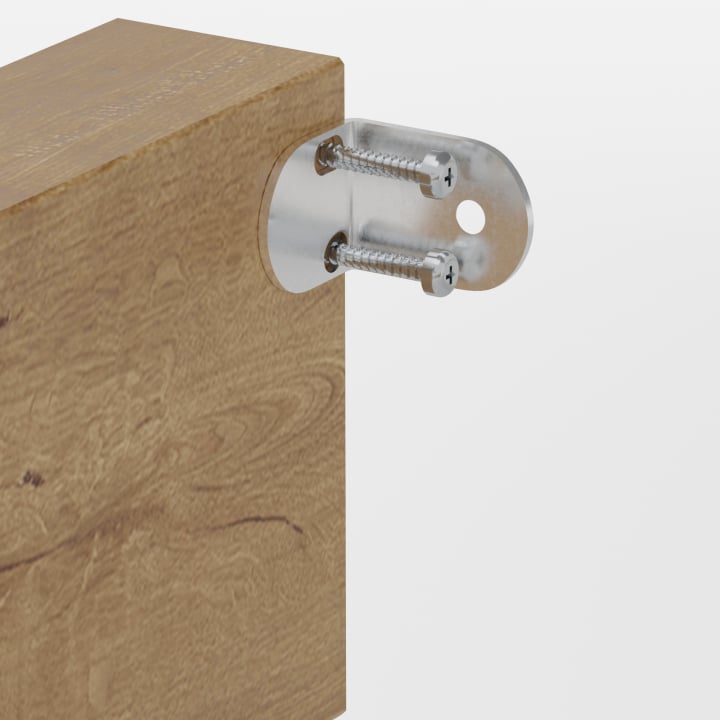
You need one stainless steel rope tensioner set for each side of a rafter. Between the rafters, you screw the mounting bracket to the side of the rafter end; under the rafters, to the underside of the rafter. In each case, use two wood screws or, on aluminium and metal, pre-drill with 4.5 mm first. Then fit and tension all the ropes first, and only hang the sail once the ropes run taut and parallel. Tensioning a shade sail shows every step.
What to Watch for on the Rafter
With installation under the rafters, each tensioner needs 28 mm of width. Two panels on a rafter 6 cm wide work in theory, but in practice it is very tight. You will only know for sure once you hold the tensioners up on site. The alternative is installing between the rafters.
The rope tension awning and the rope tension shade sail are sun protection, not a storm or rain roof. In rain, strong wind and storms, you push the sail together, and the bundle belongs under the roof. On the rope tension awning, it hangs down around 30 to 35 cm, so allow for this depth under the cover.
The Right Sail for Your Rafters
We sew to your measurements in Westoverledingen. For the rope tension shade sail, the configurator needs the following details. You can find all further topics in the Shade Sail Guide.
Measure the width in three to four places
Rafters rarely run exactly parallel. Measure between the rafters in three to four places and enter the largest value as the panel width. Under the rafters, you measure from beam centre to beam centre.
State the length including the rope tensioners
State the length including the rope tensioning system. Production deducts 10 cm for the rope tensioners. The rope and rafter are 2.5 cm apart, and the sail edge and rafter 3 cm. You do not have to allow for these distances yourself.
Taut or wavy
You choose the look when you order: taut with a runner hook spacing of about 20 cm, or wavy with about 30 cm.
The right rope
The standard is polyester rope, with a tensile load of 1,800 N on the rope tension awning. We supply stainless steel rope only by arrangement, for example from a length of around 6.5 m.
Rope tension shade sail
Sliding on two support ropes, between or under the rafters, with complete installation accessories: Made-to-measure rope tension shade sail.
Rope tension awning
In panels under a pergola or patio roof: Made-to-measure rope tension awning.
Fixed tensioned sail
Triangle, square, rectangle or trapezium for three or four fixed points: Made-to-measure shade sails.
Frequently Asked Questions
Sources
Last reviewed: 22.10.2026 · Reviewer: Germes-Team
Not Sure Whether Your Rafters Can Carry the Sail?
Send us a photo of your rafters and the distances. We will tell you whether between or under the rafters suits better and which sail goes with it.