





Tensioning a shade sail
how to get a taut sail without sagging
A shade sail sits taut when the sequence, the rope and the slope are right. This guide to tensioning a shade sail applies to the fixed, tensioned sail with three or four corners and to the rope tension shade sail. With the rope tension system, you work step by step: tension the support ropes, fit the runner hooks, hang the sail and secure it. The figures come from our manufacturing and from the questions customers ask us about installation.

There are two designs: a fixed, tensioned shade sail hangs from its corners, while a rope tension shade sail runs on support ropes. The sequence counts for both, and for the rope tension system the number of ropes counts as well.
- Fixed, tensioned sail: hook a carabiner and turnbuckle into the stainless steel rings at the corners and tension crosswise until no wrinkle remains.
- Rope tension shade sail: first fit both support ropes with the stainless steel rope tensioners and tension them firmly, then screw the runner hooks to the hem seam, snap them onto the rope and secure the sail at the back with rope stoppers and at the front with the sliding brake.
- Make full use of the thread of the stainless steel tensioners on both sides, so that there is reserve for retensioning.
- Use all the rope guides: on the rope tension awning, it is 2 for panel widths under 145 cm, 3 from 145 cm and 4 from 300 cm. If one is missing, the panel sags.
- If sagging remains, stainless steel wire rope can be tensioned tighter than polyester rope.
- Allow for the slope: 25 to 30 cm height difference per metre along the diagonal, so that rain runs off.
- Measure again in the lightly tensioned state: laid out flat, a sail looks a few centimetres shorter, in a real case 312 instead of 320 cm.
Rope tension shade sail: tensioning the support ropes
Tensioning a sail with ropes means that the rope and tensioner carry the area, not the fabric itself. So you fit and tension both support ropes first, and only then comes the sail. You carry out steps 1 to 4 on one rafter and repeat them on the opposite one. We supply all the parts with the made-to-measure rope tension shade sail.
What you need for the support ropes
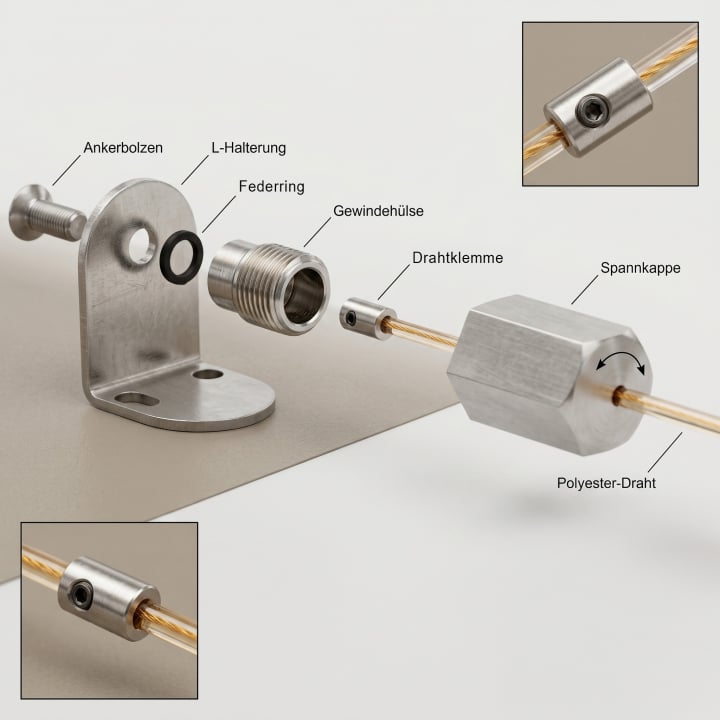
For each rafter side you need one stainless steel rope tensioner set, so two for a sail. Polyester rope is standard. We supply stainless steel rope only by arrangement, worthwhile from a rope length of around 6.5 m: rustproof, dimensionally stable and tighter to tension.
- Per set: 1 stainless steel mounting bracket with 2 wood screws, 1 countersunk screw, 1 spring washer, 1 threaded sleeve, 1 stop element with 2 grub screws, 1 tensioning element
- Tools: drill, cordless screwdriver or screwdriver, Allen key for the grub screws
- Rope length: You state the length including the rope tensioning device. We supply the tensioning ropes with reserve for clamping and tensioning.
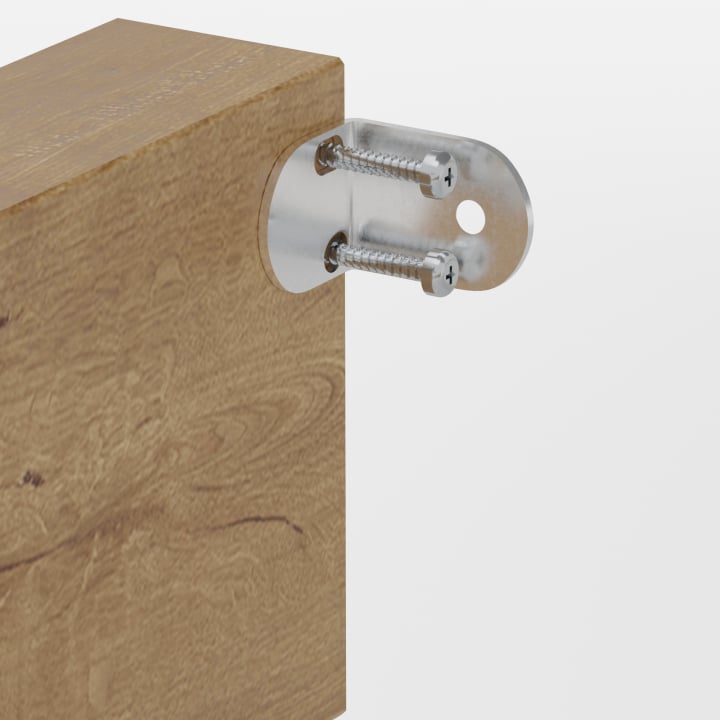
Fit the mounting bracket to the side of the rafter
If you want to tension a shade sail sideways, that is between two rafters, you fit the mounting bracket to the side of the rafter end and fix it with two wood screws. With rafters made of aluminium or metal, pre-drill with 4.5 mm, otherwise the material will tear.
- Under the rafters: The tensioners sit visibly on the underside of the rafters. The parts are designed for both ways, more under fixing a shade sail to roof rafters.
- Without a roof structure: stainless steel tensioners with a facade plate instead of a bracket directly on the wall. The wall must hold the screws permanently.
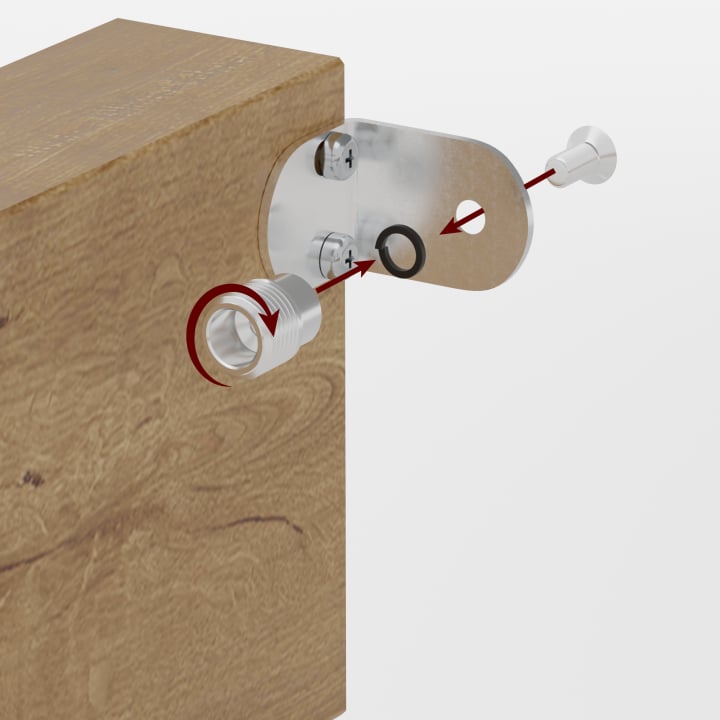
Fit the countersunk screw, spring washer and threaded sleeve
Slide the spring washer onto the countersunk screw and screw on the threaded sleeve. You fit this assembly to the bracket by passing the countersunk screw through the hole in the bracket.
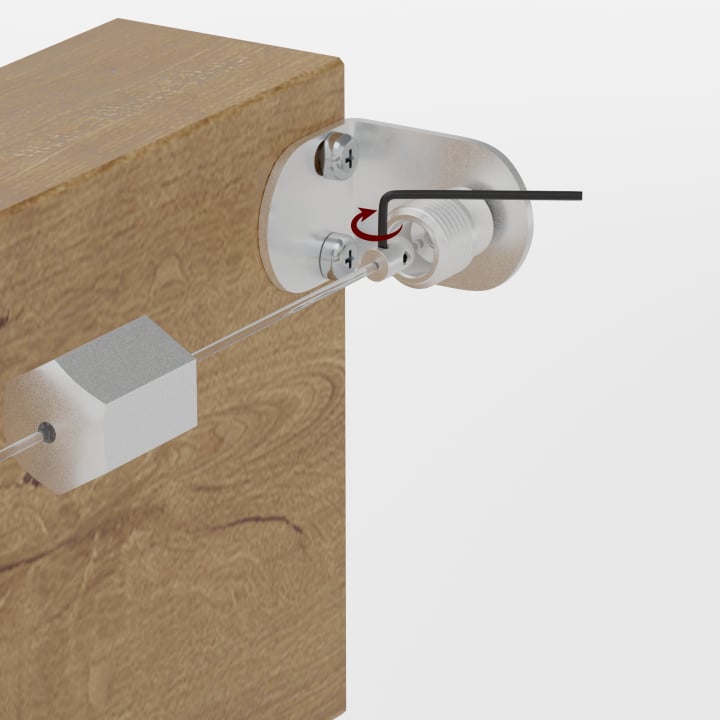
Clamp the rope in the stop element
Pass the rope through the stop element and tighten both grub screws with the Allen key. They are offset so that the rope does not slip even under tension.
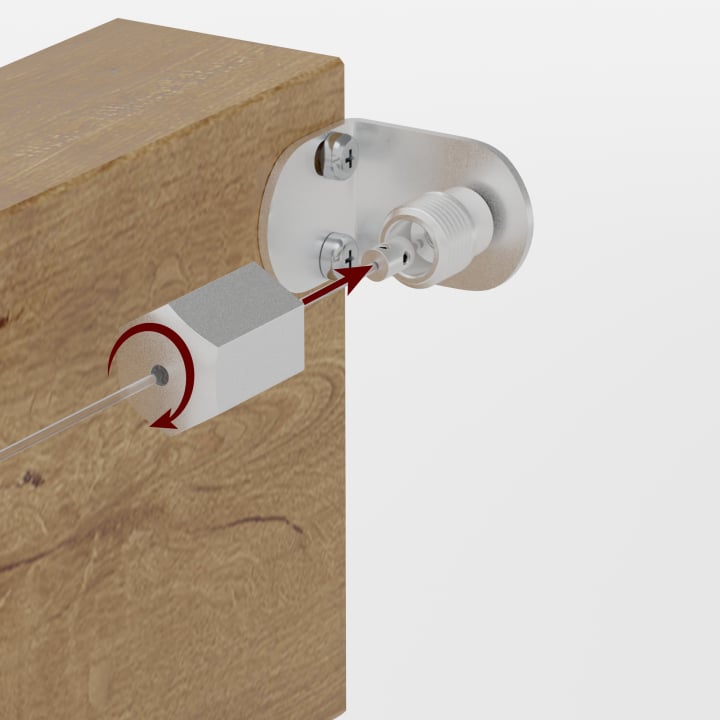
Screw on the tensioning element and tension the rope
Screw the tensioning element onto the threaded sleeve so that it encloses the stop element. It pulls the tensioner together and tensions the rope. Not too tight: the rope should be taut but not deformed.
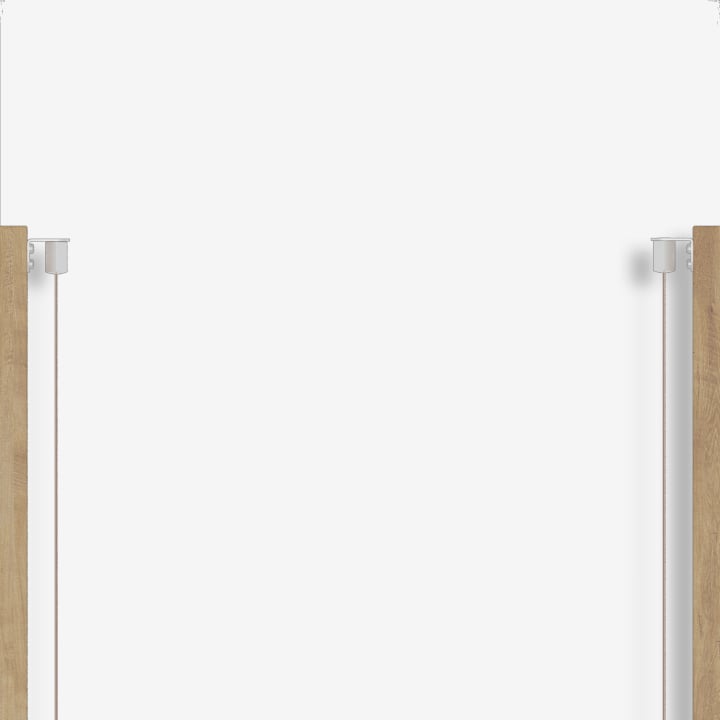
Fit the opposite side and cut the rope to length
On the opposite rafter, you repeat steps 1 to 4. There is no formula for the final length: turn the tensioner right out, clamp the rope on one side and align it on the other side, together with the clamp, on the tensioner. Only then do you cut it off.
- Both ropes must run parallel, because only then will the sail glide cleanly later.
- Make full use of the thread of the tensioners on both sides, so that there is reserve for retensioning.
Hang the sail with runner hooks and secure it
Now you attach the runner hooks to the hem seam and hang the sail on the tensioned ropes. For this, lay it on a level surface that is accessible from all sides, such as a table. You need a folding rule or ruler, a pencil and a Phillips screwdriver.
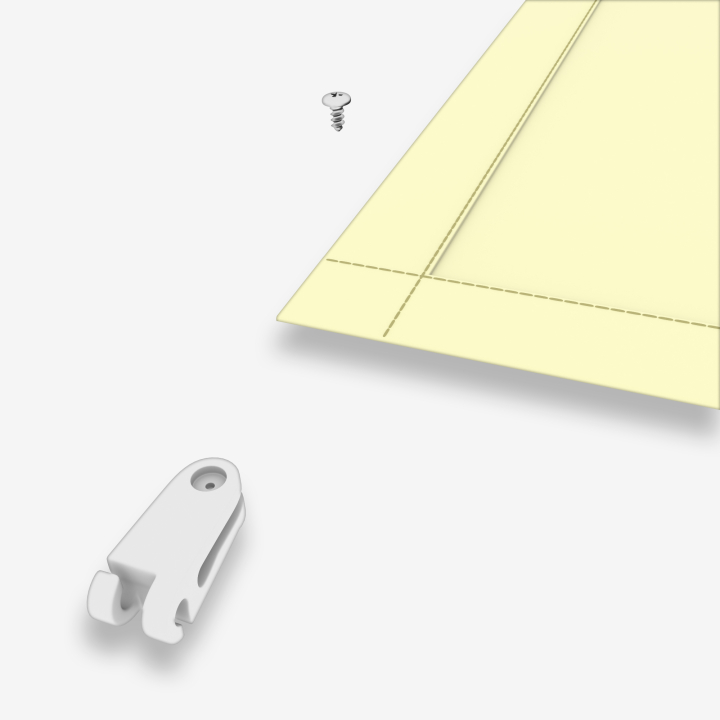
Slide the first and last runner hook onto the hem seam
Lay the sail with the hem facing up, so that you will not see hems and screw heads from below later. Slide one runner hook as far as it will go, centrally, onto the front and the rear hem seam. Press the screw in with the Phillips screwdriver and tighten it.
- The seam is 6 layers thick there, so the runner hook goes on with difficulty. Bend it open slightly with the screwdriver, and then it slides on more easily.

Work out the hook spacing and fit the remaining runner hooks
The runner hooks sit evenly 20 to 30 cm apart. With about 20 cm the sail looks taut, with about 30 cm wavy. You work out the exact spacing like this:
- Measure the distance between the first and last runner hook, from screw to screw. Example: 346 cm.
- Divide by the desired spacing and round: 346 : 25 = 13.84, rounded to 14 sections.
- Divide the measured distance by the sections: 346 : 14 = 24.7 cm hook spacing.
- Mark the positions with a folding rule and pencil, slide the runner hooks on centrally and tighten them.
- If runner hooks are missing, we will send you up to 10 more free of charge.

Snap the sail onto the rope
Start with the rear runner hook and work forward hook by hook. Press each runner hook vertically onto the rope and turn it through 90 degrees until it snaps in. The hem seams point upwards as you do so. Then the other side follows.

Secure the rear hem with rope stoppers
Place the rope stoppers on the rope directly in front of the rear runner hooks and carefully tighten the grub screw. This stops the rear hem slipping, even if the roof structure slopes.

Sliding brake on the front runner hooks
Finally, the sliding brake goes on the front runner hooks: a clamp stopper between the first and second hook. This keeps the front hem where you push it, even on a steeper slope.
- The operating pole, sliding brakes, rope stoppers and runner hooks are included in the delivery. You use the operating pole to draw the sail open and closed.
- In rain, strong wind and storms, you push the sail together. Without a roof structure, the sail, once pushed together, must lie under cover in bad weather and rain. If there is no such place, take it down beforehand. It does not replace a roof, and without a roof you use it at your own risk.
When the sail sags
If the sail or panel was hung before tensioning, the ropes can hardly be pulled taut any more. First fit all the ropes and tension them firmly, then install.
Every missing guide shows up as sagging. On the rope tension awning, it is 2 guides for panel widths under 145 cm, 3 from 145 cm and 4 from 300 cm. Use all of them, so all four on wide installations.
If the sagging cannot be fixed this way, we supply stainless steel rope by arrangement. It can be tensioned tighter. It cannot be selected in the configurator.
If the panel of a rope tension awning slides back by itself after being drawn out, a cable tie on the last pair of sliders helps. Tighten it lightly, not too tight. It cannot be seen from below.
Between the aluminium tubes of a rope tension awning, the fabric in the cloud look sags a few centimetres, about 6 to 7 cm at a tube spacing of 40 cm. This is the design, not a fault.
The finished size applies in the lightly tensioned state. Laid out flat, the fabric looks a few centimetres shorter because of the wave drape, in a real case 312 instead of 320 cm. So measure again when tensioned before you make a complaint.
The right slope
A shade sail that hangs level collects rain. So allow for the slope when choosing the fixing points.
25 to 30 cm per metre
One corner sits clearly lower than the others: 25 to 30 cm height difference per metre, measured along the diagonal. For a triangle, you measure from one edge to the opposite tip.
Avoid water pockets
If the tension is too flat, water pockets form. Water-repellent Agora lets normal rain bead off, but water seeps through in persistent or heavy rain. With 25 to 30 cm of slope per metre, the rain runs off over the low corner. When bad weather is forecast, take the sail down.
A waterproof sail needs a slope
The waterproof Cover version lets no air through. Without a consistent slope, water collects in the fabric.
Tensioning a fixed shade sail
The classic shade sail has no mechanism. It hangs from its points over the season. You tension a sail cloth over its corners. You can read which points hold the pull under fixing a shade sail.
Stainless steel ring in every corner
Instead of punched eyelets, there is a stainless steel fixing ring in the corner, and the webbing on the edge takes the pull. You hook the carabiner and turnbuckle in there. Which fittings go with it is also explained on the page about fixing a shade sail.
Tension crosswise
You tension diagonally, corner against corner, until no wrinkle remains. Edges of equal length, as on a square, can be tensioned evenly across both diagonals.
30 to 50 cm per corner
Carabiners and a turnbuckle sit between the sail corner and the fixing point. So 30 to 50 cm is added per corner, and the distance between the points is greater than the sail.
Load-bearing points
Masonry, concrete and a post in a concrete pad footing hold the pull. Gutters and trellis do not.
On a balcony
A balcony shade sail manages with short spans: house wall, railing posts, pergola beams. You can read how this works under fixing a shade sail on a balcony, and without interfering with the facade under shade sail on a balcony without drilling.
Sail to your drawing
If we make a sail to your drawing, eyelets along the long edges are also possible, with a 2 cm inner diameter at a spacing of about 30 cm, plus closed loops of about 40 cm. You pull the loops over the fixing points and tension from the eyelets.
Take down in storms
A fixed, tensioned sail is weatherproof but not storm-proof. When a storm is forecast and before winter, you take it down, let it dry and store it dry. More under cleaning a shade sail.
Tensioning a shade sail with three points or over water
You tension a triangular shade sail between three points, such as the house wall, a tree and a post. It suits places where the fourth point for a quadrilateral is missing. Over a stretch of water the same rules apply, only the points are harder to set.
Slope over the triangle height
One corner hangs lower: 25 to 30 cm per metre, measured from one edge to the opposite tip. For a 3 x 3 x 3 m triangle that is 65 to 78 cm, for a 7 x 7 x 7 m triangle 1.52 to 1.82 m.
Spacing of the points
30 to 50 cm of fixing material is added per corner. For a triangle with a 5 m edge, you therefore plan 5.6 to 6.0 m between the points.
Longer spans
For about 20 m² of shade, a 4 x 5 m rectangle on four points is enough. With three points, you need a 7 x 7 x 7 m triangle of 21.2 m² for that, so longer spans and a stronger fixing.
Slidable as a trapezoid
A rope tension shade sail can also cover a triangular or trapezoid area. It can then only be pushed together in one direction, from the wide to the narrow side. The parking position is there too.
Tensioning a shade sail over a pond
The fixing points stand outside the water: house wall, masonry or a post in a concrete pad footing. 30 to 50 cm of fixing material is added per corner.
Position the low corner deliberately
With 25 to 30 cm of slope per metre, the rainwater runs off at the lowest corner. Put this corner where the water may drain away.
A long span without rafters
A rope tension shade sail needs rafters, beams or a load-bearing wall for the support ropes. For long free spans of about 6 to 10 m without rafters, there is a special solution with wire rope and eye bolts, which we advise on individually. You therefore tension a shade sail with wire rope only in this special solution, freely between the eye bolts.
The right sail for your points
A sail that matches the points is the easiest to tension. We sew to your measurements in Westoverledingen. What to look for when comparing sails is explained under shade sails tested, and all further topics in the shade sail guide.
Shade sails with three or four corners
Triangle, square, rectangle or trapezoid, in standard sizes or made to measure, water-repellent or waterproof: made-to-measure shade sails.
Rope tension shade sail
Slides on two support ropes, with complete installation accessories: made-to-measure rope tension shade sails.
Rope tension awning
In panels of about 150 cm under a pergola or patio roof: made-to-measure rope tension awning.
Fabric for sewing yourself
If you sew yourself, you will find our outdoor fabrics as fabric by the metre.
Frequently Asked Questions
Sources
Last reviewed: 23.10.2026 · Reviewer: Germes-Team
Not sure your points will hold the sail?
Send us the distances between your fixing points and a photo. We will tell you which sail suits and how to get it taut.