





Building a shade sail mast yourself
planning height, spacing and stability correctly
Where there is no house wall or trees, a mast or post carries the corner of the shade sail. Here you can read what it has to hold, how to work out height and spacing from the sail size and where DIY builds most often fail. We deliberately give no blanket values for the footing and cross-section, because they depend on the ground, sail size and wind.
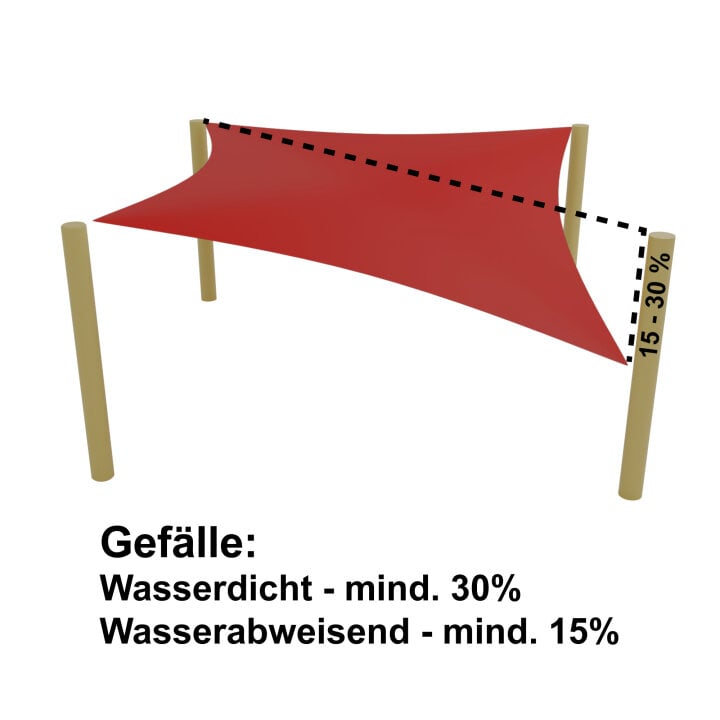
Your own mast is worthwhile if there is no fixed point for one or two corners of the shade sail. It then has to do the same job as a house wall: hold the pull of the tensioned corner, even when wind tugs at it.
- Anchor it firmly: A mast or post belongs in a concrete pad footing. A post that is merely driven in will not hold the pull of a larger sail in wind.
- Measure the spacing: Carabiners and a turnbuckle sit between the sail corner and the mast. Add 30 to 50 cm per corner, so the masts stand further apart than the sail is long.
- Work out the height from the slope: One corner sits 25 to 30 cm per metre of diagonal lower than the highest. For a 4 x 4 m square, that is a difference of 1.41 to 1.70 m.
- Have the footing and cross-section designed: A landscape gardener or a metalworker is the right person to ask.
- Take the sail down in storms and before winter. This relieves the mast and footing.
What the mast has to carry
A shade sail has no mechanism. All of its tension ends up at the corners and from there in the mast, the footing and the ground. You can read which fixing points come into question in principle under fixing a shade sail.
The force sits at the corner
Wind presses on the surface, but the sail is held at the corners. The larger the sail, the more it pulls. With 24 m², considerable forces act on every corner, and so on every mast, even in moderate wind.
What holds and what does not
Masonry, concrete and posts or masts in a concrete pad footing can bear the load. Gutters, trellis, thin sheet metal and driven-in posts do not hold the pull. For a missing point, a mast you build yourself is therefore the usual solution.
Three points need longer spans
For about 20 m² of shade, a 4 x 5 m rectangle on four points is enough. With three points, you need a 7 x 7 x 7 m triangle for that. The spans are longer, and the mast must be anchored more strongly.
No blanket figure
For a freely tensioned sail, we do not give a fixed force per corner, a minimum depth for the footing or a mast cross-section. These values depend on sail size, tension, ground type and exposure to wind. Have a specialist firm design them for your site.
Taking it down relieves the load
A fixed, tensioned sail is weatherproof but not storm-proof. When a storm is forecast and before winter, you take it down. Wet snow quickly weighs several hundred kilos and strains the seam and anchoring more than the whole summer. More under shade sails in wind.
How high and how far apart the masts stand
The absolute mast height depends on your highest point, often the house wall, and on the headroom beneath. The height difference is fixed: 25 to 30 cm per metre, measured along the diagonal, and for a triangle from one edge to the opposite tip. The spacing of the masts is the sail dimension plus 30 to 50 cm per corner for the carabiner and turnbuckle. A height-adjustable mast helps to set the low corner precisely.
| Sail | Diagonal or triangle height | Height difference, highest to lowest corner | Spacing of the points per edge |
|---|---|---|---|
| Square 3 x 3 m | 4.24 m | 1.06 to 1.27 m | 3.6 to 4.0 m |
| Square 4 x 4 m | 5.66 m | 1.41 to 1.70 m | 4.6 to 5.0 m |
| Square 5 x 5 m | 7.07 m | 1.77 to 2.12 m | 5.6 to 6.0 m |
| Rectangle 4 x 6 m | 7.21 m | 1.80 to 2.16 m | 4.6 to 5.0 m and 6.6 to 7.0 m |
| Square 6 x 6 m | 8.49 m | 2.12 to 2.55 m | 6.6 to 7.0 m |
| Triangle 3 x 3 x 3 m | 2.60 m | 0.65 to 0.78 m | 3.6 to 4.0 m |
| Triangle 7 x 7 x 7 m | 6.06 m | 1.52 to 1.82 m | 7.6 to 8.0 m |
Setting the mast in six steps
Decide on the points
Points first, then the shape, then the dimensions. Establish which corners go on the house wall or existing posts and where a mast is missing. Three points give a triangle, four a square, rectangle or trapezoid.
Measure the spacing
Measure between the planned points and allow 30 to 50 cm per corner for the carabiner and turnbuckle. For a sail with a 4 m edge, the points are therefore 4.6 to 5.0 m apart.
Decide on the height
Determine the highest point and plan the lowest corner 25 to 30 cm per metre of diagonal below it. Waterproof sails need this slope consistently, otherwise water collects in the fabric.
Set the mast in the footing
Set the mast or post in a concrete pad footing. Have a landscape gardener or metalworker determine the depth, size and cross-section for your ground and your sail.
Attach the fixing point
At the top of the mast sits an eye bolt or eyelet, suited to the material. You hang the carabiner and turnbuckle in the stainless steel ring of the sail corner.
Hook in and tension crosswise
Hook in all corners loosely, then tighten diagonally until no wrinkle remains. After a few days, check the tension and retighten if needed.
Building a post for a shade sail yourself
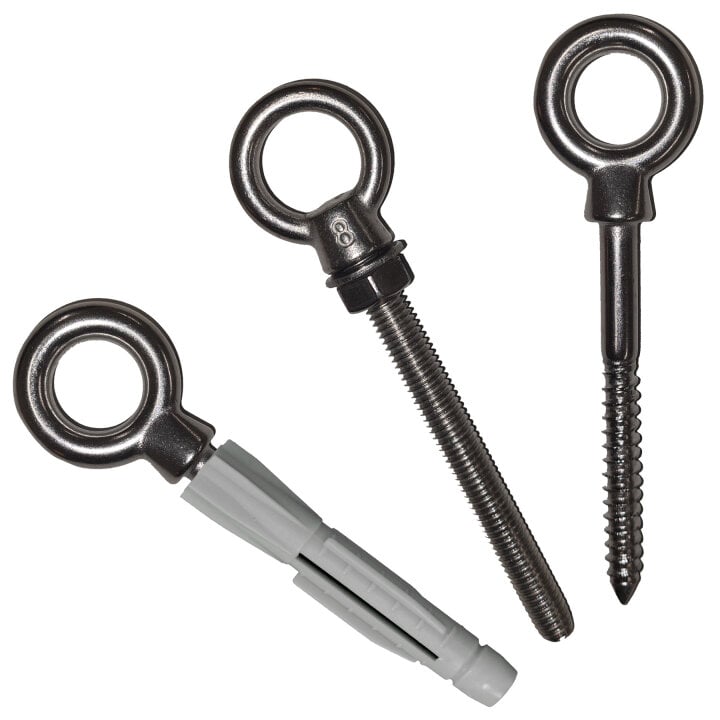
You plan a post for the shade sail by the same rules as a mast: a concrete pad footing, a load-bearing fixing point at the top, enough height for the slope. The differences are in the material and the installation. Which fittings belong at the corner is described in the guide to fixing a shade sail.
- Wooden post: Solid wooden posts need fixings for wood, such as an eye bolt with a wood thread.
- Masonry and concrete: Here the eye bolt sits with a wall plug. Wall anchors belong in masonry or concrete, not in plaster or insulation.
- Use existing posts: On a balcony, railing posts, the house wall or pergola beams are often enough for short spans. How to do this without interfering with the facade is explained under shade sail on a balcony without drilling.
- Long distance: If the post is further away than the 30 to 50 cm of fixing material, a stainless steel chain or a rope bridges the gap.
- Without concrete: A post that is merely driven in will hold a small sail on short spans, but not a large one. For a large sail, set the post in a concrete pad footing.
Typical mistakes when building masts
Without a height difference, the sail hangs level and collects rain. Plan the low corner when you set the masts, as it can later only be corrected with a height-adjustable mast.
If the masts stand exactly at the sail dimension, there is no room for the carabiner and turnbuckle. Add 30 to 50 cm per corner.
A driven-in post gives way under pull, the sail sags and the post leans. Masts for larger sails belong in a concrete pad footing.
Gutters, trellis and thin sheet metal look stable but do not hold the pull. If there is no load-bearing point, it is better to set one more mast.
If the sail sags despite solid masts, the cause is usually the tension. How to get it taut is explained under tensioning a shade sail.
Mast for a rope tension system
The rope tension awning and the rope tension shade sail run on ropes and can be pushed together. Different figures apply to them than to the fixed, tensioned sail. The following values apply only to this design.
Rope tension awning between wall and mast
A rectangular area between the house wall and a mast is a standard case for the rope tension awning. From a panel width of 300 cm, four parallel ropes are mandatory, on the wall side and on the mast side, each with its own rope tensioner. Check beforehand from a structural point of view whether the mast can bear this.
Rope and tensile load
On the rope tension awning, polyester rope with a 1,800 N tensile load is standard. The same applies to the rope tension shade sail. We supply stainless steel rope only by arrangement, from a rope length of around 6.5 m.
Test one panel first
If it is unclear whether the fixing of a rope tension awning will hold, we will first make a single panel on request. You test it at your own risk. If the structure holds, the remaining panels follow.
Steep slope
On steeply sloping areas, the fixed, tensioned sail is the reliable choice, and a rope tension awning reaches its limits there. What counts when installing it is explained under installing a rope tension awning. Long free spans of about 6 to 10 m without rafters are solved as a special solution with wire rope and eye bolts, which we advise on individually. More on the design under made-to-measure rope tension awning.
The right sail for your masts
Once the masts are up, we sew the sail that suits your points in Westoverledingen. You will find all further topics in the shade sail guide.
Made-to-measure shade sails
Triangle, square, rectangle or trapezoid, in standard sizes or made to measure. There you will also find a complete set with masts: made-to-measure shade sails.
Every edge individually
If the spacing of your masts does not match any standard size, enter each edge length individually in the shade sail configurator.
Loops for the mast
If we make a sail to your drawing, closed loops of about 40 cm are possible, which you pull over the fixing points. In addition, eyelets along the long edges with a 2 cm inner diameter at a spacing of about 30 cm.
Sewing the sail yourself
If you also build the sail yourself, you need extra-wide outdoor fabric. How to do it is explained under making a shade sail yourself, and the fabrics are available as fabric by the metre.
Accessories
You will find carabiners, turnbuckles and other fixing material under shade accessories.
Frequently Asked Questions
Sources
Last reviewed: 23.10.2026 · Reviewer: Germes-Team
Masts planned, looking for a sail?
Send us the distances between your masts and fixing points and a photo. We will tell you which sail suits and sew it to your measurements.