





Rope tension shade sails explained
Setup, sizes, fabrics and mounting locations
A shade sail on a rope tension system runs on two tensioned ropes and can be pushed together whenever you like. Here you can read how it is built, how it differs from a rope tension awning, which sizes and fabrics are available and where it can hang. The details come from our own production and from the questions customers ask us.
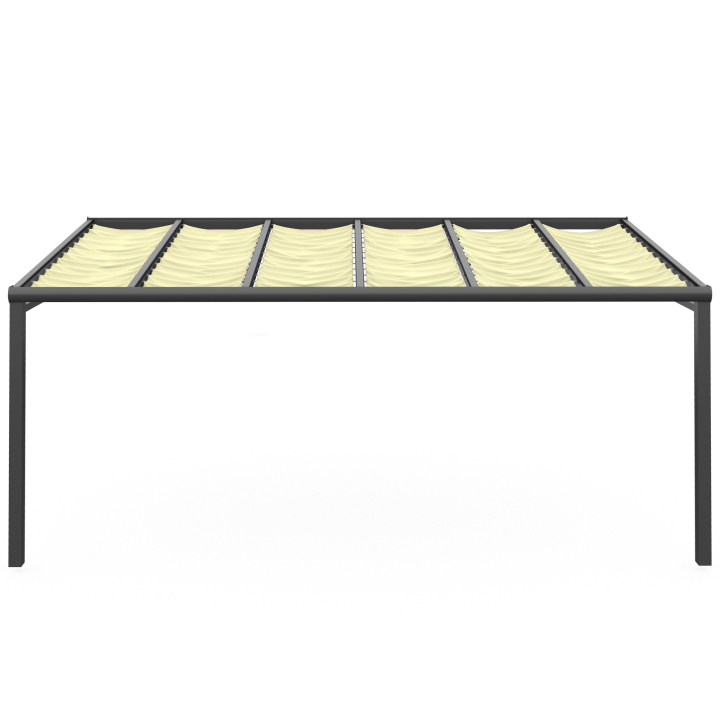
A rope tension shade sail is a continuous shade sail with runner hooks that glide on two tensioned ropes. Technically it is related to the rope tension awning, but it has no aluminium tubes dividing the fabric into sections. The key facts:
- Slides back and forth: you push the sail together whenever you like and free up the sky.
- Mounting locations: between or under the rafters of a pergola or roofed structure, and without a roof with facade plates on the wall. Without a roof, the sail pushed together must be kept under cover during storms and rain. If there is no room for this, take it down beforehand. It does not replace a roof, and without a roof you use it at your own risk.
- Sizes: up to 1.5 m wide and up to 7 m long per sail. You give the length including the turnbuckles, and we make the fabric 10 cm shorter.
- Fabrics: Dralon made of acrylic or Olefin made of polypropylene.
- Look: taut with about 20 cm between the runner hooks, or softly wavy with about 30 cm.
- Accessories: the complete mounting kit is included, including the operating pole and glide brakes. The standard rope is polyester. We supply stainless steel wire rope only by arrangement, for example from a length of about 6.5 m.
- Use: it is pure sun protection. In rain, strong wind and storms you push it together.
Where a rope tension shade sail hangs
Installation has two parts: first you fit and tension the two support ropes with the stainless steel turnbuckles, then you hang the sail on its runner hooks. At the back, rope stoppers hold the hem, at the front the glide brake does. How to tension a shade sail shows every step with pictures.
Between the rafters
The turnbuckles sit on the side of the rafter end, and the sail runs in the bay between two rafters. You measure the clear width between the rafters. In aluminium or metal rafters, pre-drill with a 4.5 mm bit. What holds there is explained under Attaching a shade sail to roof rafters.
Under the rafters
The turnbuckles sit visibly on the underside of the rafters. This works if the rafters are too shallow for installation between them, or if you want the ceiling to look flat. Here you measure the bay width from the centre of one beam to the centre of the next.
Without a roof, on the wall
If there is no roof, stainless steel turnbuckles with a facade plate go on the wall. The wall must hold the screws permanently. In storms and rain, the sail pushed together must be kept under cover. If there is no room for this, take it down beforehand. It does not replace a roof, and without a roof you use it at your own risk. More under Attaching a shade sail to the house wall.
Long span without rafters
If there are no rafters over a span of about 6 to 10 m, there is a special solution with a freely tensioned stainless steel wire rope between eye bolts. It sags more and is more sensitive to wind. We design it individually from photos and a sketch.
Rope tension shade sail or rope tension awning?
Both run on ropes, and you push both together by hand. The difference lies in how the fabric is built, and so in stability and appearance. We present the awning itself under Rope tension awning made to measure.
Rope tension awning
Aluminium tubes at even intervals divide the fabric into sections. This gives a calm, uniform look and more stability. In most cases we therefore recommend the rope tension awning.
Rope tension shade sail
The simpler design without continuous tube divisions: one sail that runs on runner hooks. It is lighter and less exposed to wind. If there is no roof over the area, it is often the better choice.
Sloping areas
For trapezoid or triangular areas, the rope tension shade sail comes into its own. Rectangular bays can be fitted with a rope tension awning and the sloping remaining area with a rope tension shade sail, all in the same fabric.
Fixed shade sail
On a steep slope, in exposed locations or over large areas without rafters, a permanently installed shade sail is the more reliable solution. It has no mechanism and hangs from its corners. How to attach it is explained under Attaching a shade sail.
Sizes and how to measure correctly
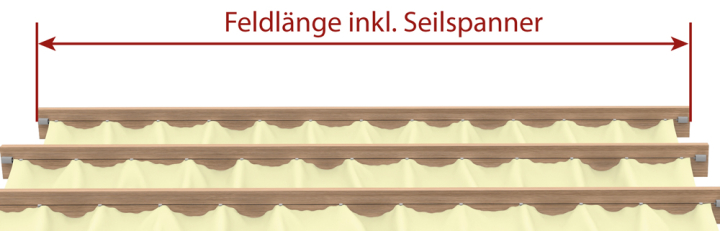
The measurements decide whether the sail will run taut later. You will find the measuring guide with drawings at Rope tension shade sail made to measure. The most important points:
- Size: up to 1.5 m wide and up to 7 m long are possible per sail. Wider areas get a separate sail for each rafter bay.
- Width between the rafters: measure the clear width at 3 to 4 points and give the largest value. Rafters rarely run exactly parallel.
- Width under the rafters: from the centre of one beam to the centre of the next.
- Length: give it including the rope tensioning hardware. We deduct 10 cm for the turnbuckles, so that sail and turnbuckles together come to exactly your measurement.
- Single panels with pre-fitted runner hooks: here your measurement counts as the finished fabric size, and nothing is deducted. The runner hooks protrude 1 cm on each side.
- Fixed distances: rope to rafter 2.5 cm, sail edge to rafter 3 cm.
- Tolerance: when the length is deducted, a deviation of 0.5 to 1.5 cm is normal.
Dralon or Olefin
We make the rope tension shade sail from Dralon or Olefin. Both fabrics repel water and are made for the sun. They differ in fibre and colour retention. The best way to check colour and feel is with free fabric samples.
Dralon made of acrylic
Dralon is 100 % acrylic, water-repellent, mildew-resistant and UV-resistant. The UV protection is UPF 50 according to AS/NZS 4399. There is a wide choice of colours, plain or striped. The fabric comes from Spain, and we sew the sail in Germany.
Colour retention of Dralon
Depending on the colour, the lightfastness is 4 to 6 out of 8 according to UNE EN ISO 105-B02. For seasonal use from spring to autumn, this is no problem. In full sun all year round, sensitive colours can fade after a few years.
Olefin made of polypropylene
Olefin is 100 % polypropylene. The fibre does not absorb moisture, dries quickly and is naturally UV-resistant. The lightfastness is above 7 according to EN ISO 105-B02.
Guarantee on the colour
Olefin comes with a 2-year guarantee on colour retention (colourfastness).
Rope, turnbuckles and what is included
On a rope tension shade sail, the rope carries the tension, because there is no fixed structure above the sail. That is why it is worth looking at the rope material.
Complete accessories in the package
You get everything you need for installation: stainless steel turnbuckles, rope, runner hooks, rope stoppers, glide brakes and operating pole. An aluminium reinforcing tube sits in the front hem. There are no mandatory accessories to reorder. The instructions are not included in print, they are online.
Stainless steel rope by arrangement
Polyester rope is the standard. We supply stainless steel wire rope only by arrangement, as in some locations it makes more sense. It cannot be selected in the configurator.
Stainless steel rope from about 6.5 m
Dead weight, fabric weight and wind load grow with the length. From about 6.5 m, stainless steel wire rope is the right choice: rustproof, dimensionally stable and easier to tension tightly. Please discuss this with us before ordering.
Runner hooks as a replacement
If you are missing runner hooks, we will send up to 10 more free of charge.
Rectangle, trapezoid and triangle
The rectangle is the simple shape: the sail runs in both directions. With a trapezoid and a triangle, the shape dictates the direction.
Only from wide to narrow
You push a trapezoid or triangular sail together from the wide side to the narrow side. It does not work the other way round, because there is less fabric on the narrow side.
Parking position on the narrow side
Think beforehand about where the sail pushed together should rest. With a trapezoid or triangle, this is always the narrow side.
Give three measurements
For a trapezoid area we need the narrow and the wide side as well as the length between them. Do not draw your area as a rectangle if it runs at an angle, and measure each bay separately.
Fix the remaining areas
On a pergola with a sloping remaining bay, there is also the option of closing the remaining area with a permanently installed triangular shade sail in the same fabric. It then stays shaded permanently, without a mechanism.
Push together in wind and rain
A rope tension shade sail protects against sun, not against wind and weather. In rain, strong wind or storms you push it together. How sails cope with gusts is explained under Shade sails in wind.
Ideally you park the sail pushed together under a roof. Without a roof, it must be kept under cover during storms and rain. This keeps the fabric and ropes clean and working for a long time. If there is no room for this, take it down beforehand. It does not replace a roof, and without a roof you use it at your own risk.
The rope tension shade sail suits places where you only need shade now and then and otherwise want to keep the sky open. How to keep the fabric clean is explained under Cleaning a shade sail.
Frequently Asked Questions
Sources
Last reviewed: 22.10.2026 · Reviewer: Germes-Team
Does a rope tension shade sail suit your pergola?
Send us the measurements of your bays and a photo. We will tell you whether a sail or a rope tension awning fits better and which rope you need.