





Attaching a Balcony Screen
with cord or cable ties
A balcony screen holds on the railing by stainless steel eyelets in the hem. Through these eyelets you pull either cable ties or a cord and use them to tie the screen in place. Here you can read what suits your balcony, how to thread the cord through the eyelets, how to tension evenly and how to untie the screen again in autumn.
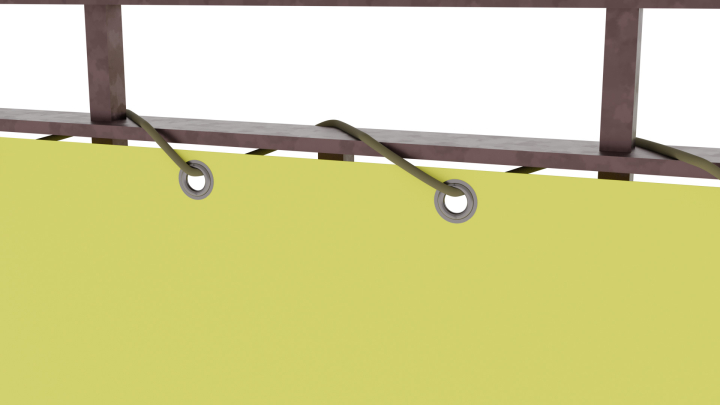
To attach a balcony screen, you need neither a drill nor wall plugs. The screen has stainless steel eyelets in the hem, at the top and bottom, and at the sides if needed. Through each eyelet you pass a fastener around the railing.
- Cord or cable ties: either holds the screen on the railing. Cable ties go on quickly and hold firmly, while a cord is easier to untie and re-tension.
- Order: tie the corners at the top and bottom first, then the eyelets in between. That way the screen sits straight before you tension it.
- Tension: taut enough that the screen does not flap, but not so taut that the pull tears at individual eyelets. In the end, you should see no more creases.
- Taking it down: you untie cords and cut off cable ties. The screen stays undamaged and goes back in the same place next season.
Fixing a Balcony Privacy Screen with Cable Ties

If you want to fix the privacy screen with cable ties, pull a tie through each eyelet, loop it around the handrail or a bar of the railing and pull it tight. Installing with cord takes a little longer, but is more flexible. Which suits you better depends mainly on how often you take the screen down.
- Cable ties from our shop: polyamide, 4.8 x 300 mm, they fit around a tube up to 76 mm in diameter. Available in white, red, blue, yellow, green and black.
- Advantage of cable ties: every point holds firmly straight away and does not give. The excess end comes off with side cutters.
- Advantage of cord: you can untie it, tighten it again and reuse it. To take the screen down in autumn, you do not have to cut anything.
- Thick railing: if the handrail is thicker than 76 mm, a cable tie does not reach round. Then use the cord, which you cut to any length.
What You Need
It is not much. If you choose a fixing when you order a made-to-measure balcony screen, cable ties or cord are included in the delivery.
Cord
A polypropylene cord, 5 mm thick, in several colours to match the fabric. We include enough cord, and you cut it to the length you need.
Or cable ties
You need one cable tie per eyelet, at the top and bottom. Count the eyelets before installing, and you will know how many to have ready.
Scissors
For cutting the cord to length and trimming the ends after knotting.
Side cutters
For cleanly snipping off the excess ends of cable ties. Sharp stubs could otherwise scratch your hands and the fabric.
A second person
With long screens, a second person holds the screen in position while you tie the first corners.
Threading the Cord through the Eyelets and Tensioning It
Prepare the cord
Decide whether to tie each eyelet separately or run one cord continuously. For single points, cut pieces of equal length, long enough for two turns around the railing and a knot.
Tie the corners first
Hold the screen against the railing the way it should sit later. Tie the two upper corner eyelets first, then the two lower ones.
Thread the cord through the eyelet
Pass the cord from the outside through the eyelet, around the handrail or bar and back again. Work from one corner to the other, alternating between top and bottom.
Tension evenly
Pull each cord with about the same force. From time to time, check from a few steps away that the screen hangs straight and has no creases.
Knot and trim
Knot each cord securely, for example with a double knot. Cut the ends off with scissors, but leave a short piece.
Re-tension
Check all the knots after the first windy days. Tighten any loose points so that the load is spread across all the eyelets again.
Cord in Pieces or Continuous
The cord comes in one length, and you cut it as needed. If you fit the balcony privacy screen with cord, there are two ways to run it.
In pieces
A separate piece of cord with its own knot for each eyelet. Each point can be re-tensioned on its own. If one knot ever comes loose, all the others stay firm.
Continuous
One long cord runs like lacing from eyelet to eyelet around the railing and is only knotted at the ends. This is quick and spreads the pull evenly. If the cord gives way in one place, however, the whole row loosens.
Cord or rope
Instead of the cord supplied, you can also use another rope or string, as long as it is meant for outdoor use and fits through the eyelet.
Tensioning, Re-tensioning and Untying Again
A well-tensioned screen does not flap and does not bang against the railing. The whole installation process for the balcony privacy screen, from preparing the railing to the final check, is shown in the guide Attaching a privacy screen to a balcony railing.
Even rather than maximum
Tension all the points about equally. A single over-tightened point pulls creases and loads its eyelet more than the others.
Re-tensioning
Knots can settle over time. A quick look at the cords after windy days is enough, and you retie any loose points.
Untie to take it down
You untie cords and reuse them. You cut cable ties open carefully, without touching the fabric, and use new ones the next time you hang the screen.
In a storm
A balcony screen is privacy protection, not storm protection. What applies in strong wind and when it is better to take the screen down is explained under Wind protection for patio and balcony.
Balcony Screen with Eyelets, Made to Measure
We sew your balcony screen to your measurements in Westoverledingen, with stainless steel eyelets in the hem and the fixing of your choice. You can find more instructions and ideas in the Balcony Privacy Screen Guide.
Order the fixing at the same time
With the made-to-measure balcony screen, you choose cable ties or cord in the colour that suits the fabric and railing.
Measure correctly
How to take the width and height for each panel is explained in Making a balcony privacy screen yourself. Whether you use a separate balcony screen for each side of a corner or one long screen around the corner is shown in Balcony enclosure: ideas.
Four fabrics, plain or striped
The balcony screen comes in four opaque fabrics, plain or striped. Which fabric suits your balcony is explained in the Balcony privacy screen ideas.
Curtain and shade sail
A balcony curtain hangs from a wire rope or track instead of cords. How to fix a shade sail on a balcony is explained under Fixing a shade sail to a balcony.
Send a photo
Does your railing have an unusual shape? Send us a photo and the measurements via the Service Centre.
Frequently Asked Questions
Sources
- Balcony Privacy Screen Guide
- Made-to-Measure Balcony Screen
- Attaching a Privacy Screen to a Balcony Railing
Last reviewed: 09.11.2026 · Reviewer: Germes-Team
Questions about Fixing to Your Railing?
Send us a photo of your railing and the measurements. We will tell you whether cord or cable ties suit better and where the eyelets should sit.